Read comfortably in the e-reader
Add EPUBs, PDFs and images to your Library, then read with your own theme, font and layout. Terra remembers your place in every book.
Most of us read in one app and think in another. The book lives in an ebook app, the ideas it sparks end up in a notes app, and the two never meet again.
In Terra, a book is part of your Library. You drop in an EPUB and it opens in Terra's own reader — your theme, your font, one column or two — with a note of its own for your thoughts. Close it mid-sentence and it reopens on the same paragraph, weeks later.
How it fits together
When you add a book, Terra keeps three things together in the folder you chose:
- The book itself — the
.epubfile. Terra never changes it. - The book's note — an ordinary note with the title, author, publisher and cover filled in for you. Its body is empty and yours to write in.
- A small data file — where Terra keeps your place, your highlights and bookmarks, and this book's display settings. You never have to touch it. Annotate and keep every mark explains what's inside.
In your note list you see a single item: the book's note, with an EPUB label. Open it and the reader appears.
| File | Opens in | What you can do |
|---|---|---|
| EPUB | The book reader | Read, change the look, highlight, bookmark, export notes |
| The PDF viewer | Read, zoom, highlight text, draw markup | |
| Images (PNG, JPEG, GIF, WebP, SVG, HEIC, AVIF) | The image viewer | View, copy |
Every other kind of file Terra understands is listed in Accepted file formats.
Step 1Add a book
- In Finder, find the
.epubfile. - Drag it into the Terra window:
- drop it anywhere in the window to put it in your Inbox, or
- drop it on a folder under Folders in the sidebar to file it there — a
Readingfolder, say.
- A single book opens straight away. If you dropped several files, Terra shows Added 3 of 3 files; click Show to see them.
The book appears in the note list with an EPUB label beside its folder.
Step 2Find your way around the reader
Open the book by clicking it in the note list.
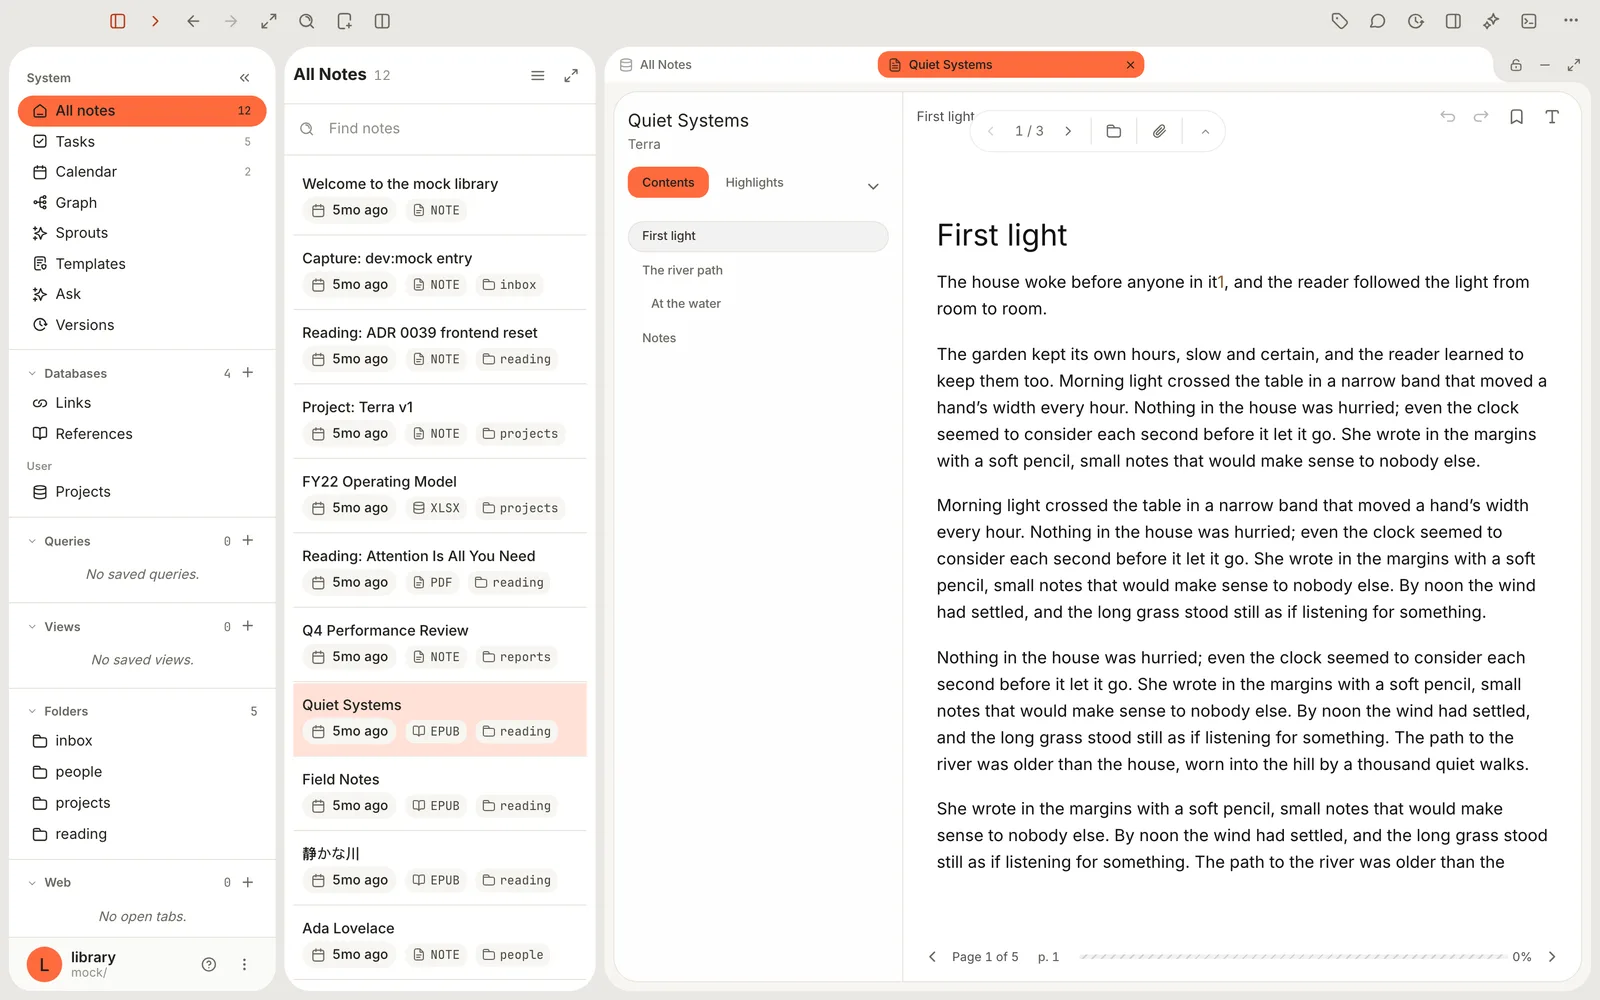
Here's what you're looking at:
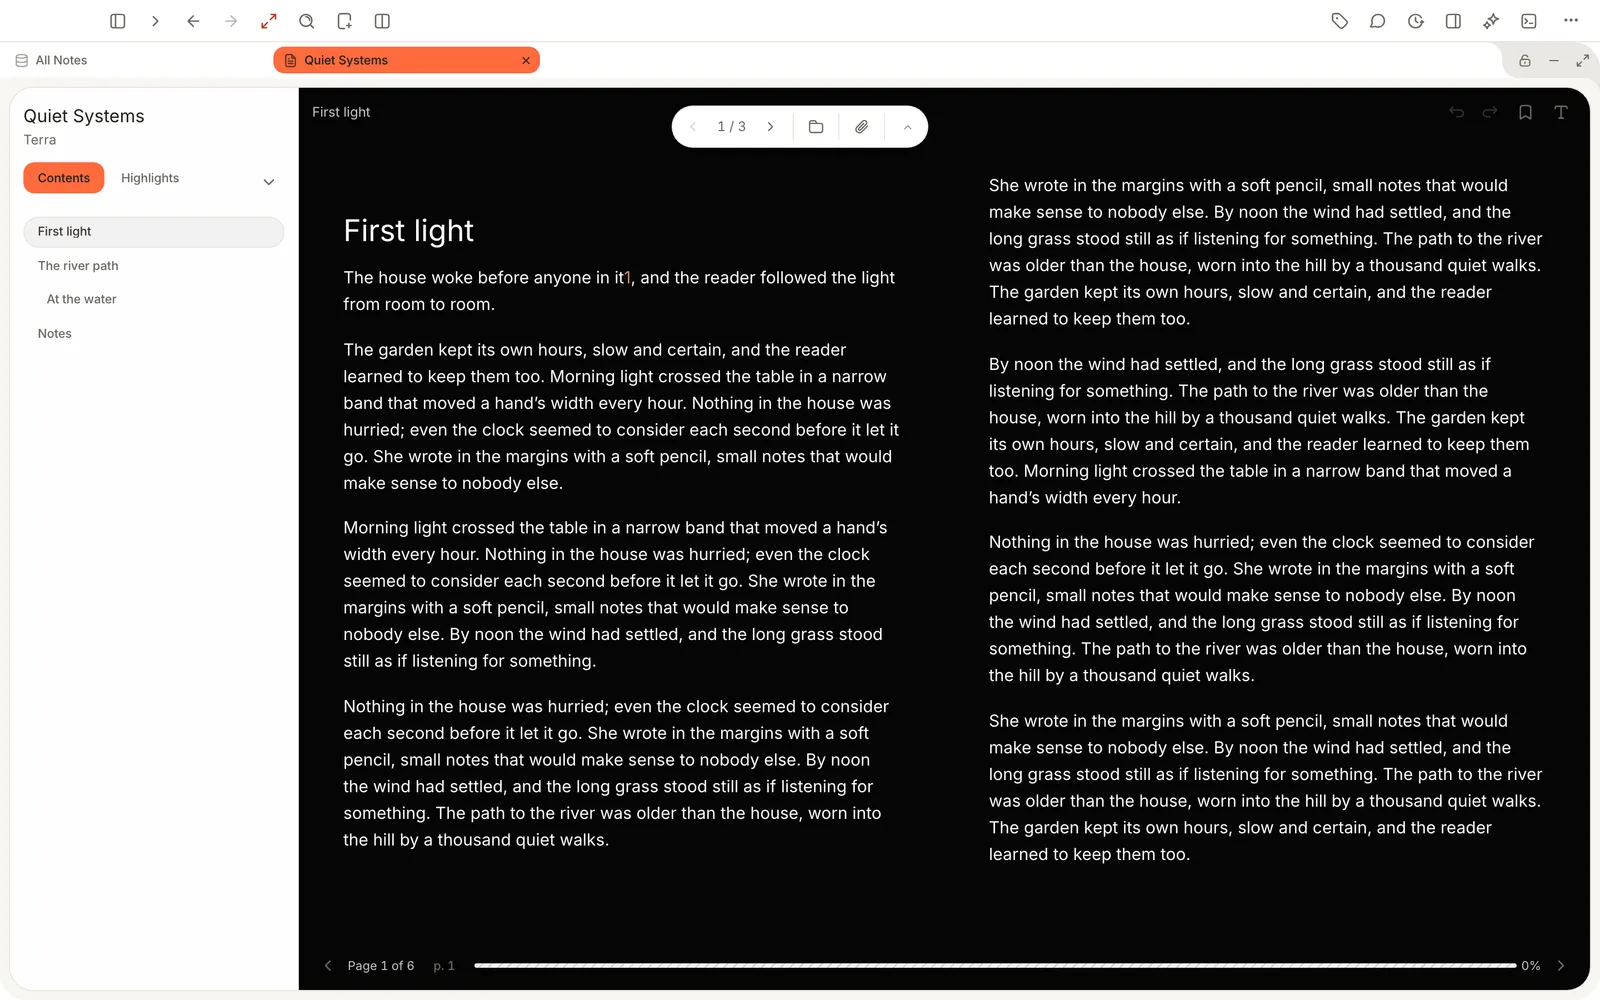
- Left column. The title and author, then three tabs: Contents (the table of contents), Highlights and Bookmarks. In a narrow pane, Bookmarks hides behind the small arrow beside the tabs.
- Top of the page. The chapter you're in, Back and Forward (for jumps within the book), Bookmark this page, and Reader appearance — the T icon at the top right, where every display setting lives.
- Floating tools. The pill near the top steps from chapter to chapter (it reads 1 / 3 in a three-chapter book). Beside it are Reveal in Finder, Show note (the paperclip) and Hide tools. Drag the pill to move it out of your way.
- Bottom of the page. Page 1 of 5 is your page within this chapter. The bar and the percentage at the right are your progress through the whole book.
Step 3Move through the book
Click once on the page first, so the reader has your keyboard. Then:
| To | Press | Or |
|---|---|---|
| Turn to the next page | →orSpaceorPage Down | Click Next page at the bottom right |
| Turn back a page | ←or⇧SpaceorPage Up | Click Previous page at the bottom left |
| Go to the next or previous chapter | ⇧⌘→or⇧⌘← | Use the arrows in the floating pill |
| Jump to the start or end of the book | ⌘Homeor⌘End | |
| Go to a printed page number | ⇧⌘P | Click Go to page at the bottom |
| Return to where you were before a jump | ⌘⌫ | Click Back at the top of the page |
Turning past the last page of a chapter takes you into the next one, so you can read straight through with the arrow keys.
Jump with the table of contents
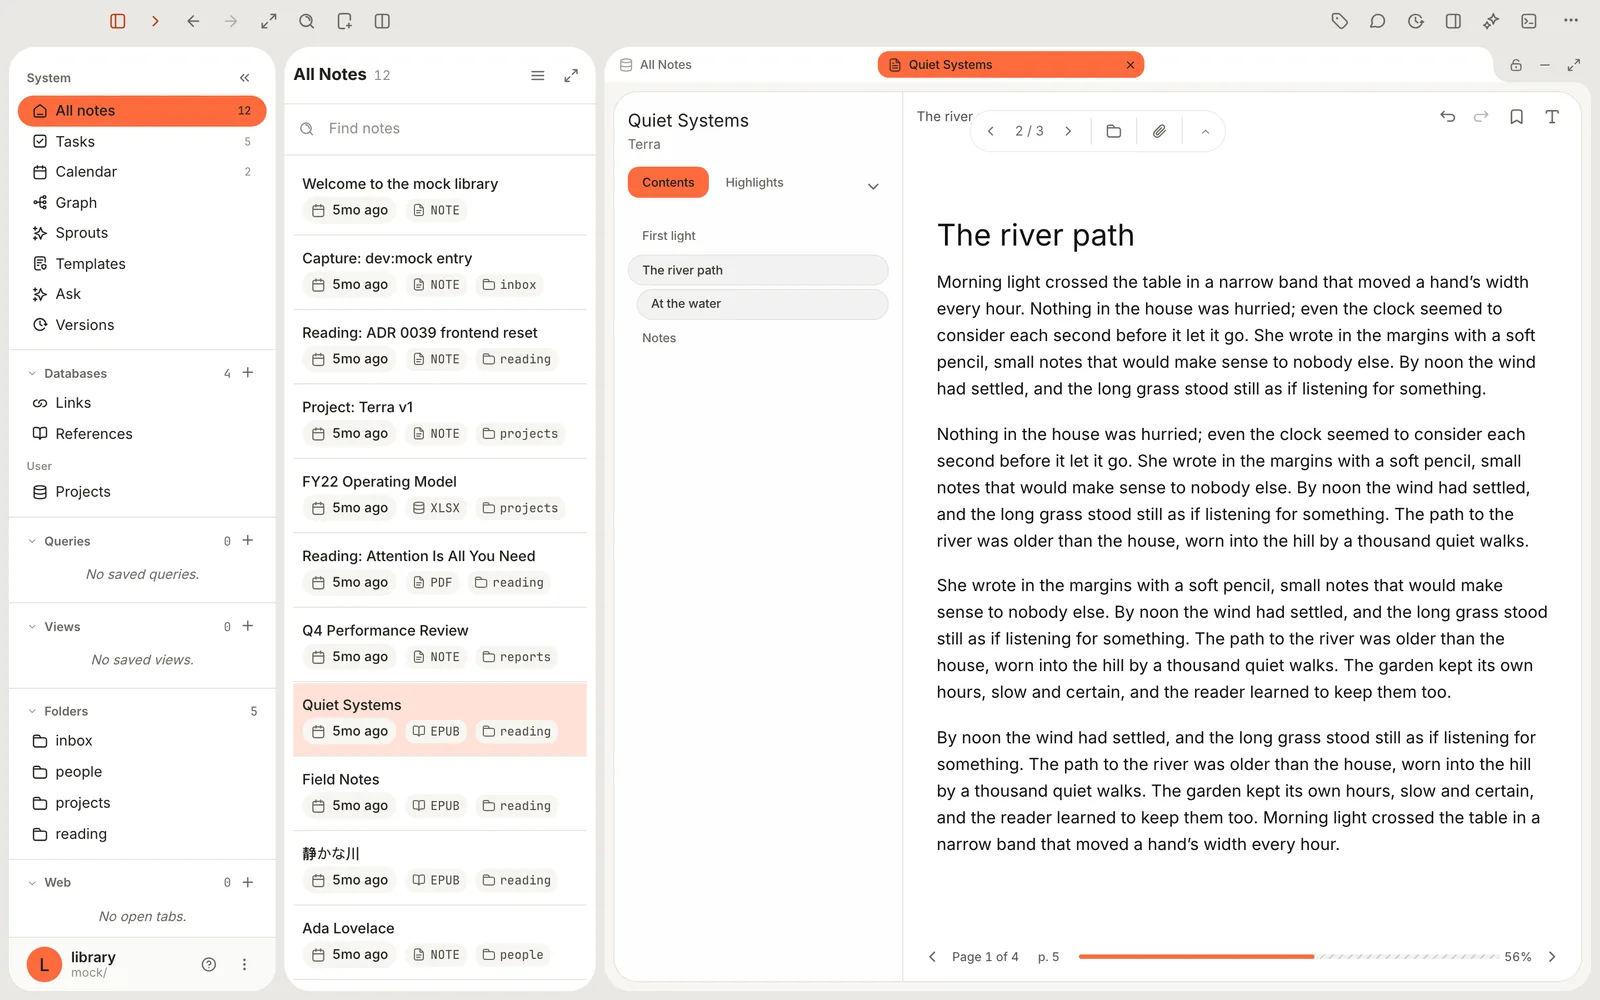
Click a chapter in Contents. The reader jumps there and briefly outlines where you landed, and the progress bar catches up.
Go to a page number from the printed edition
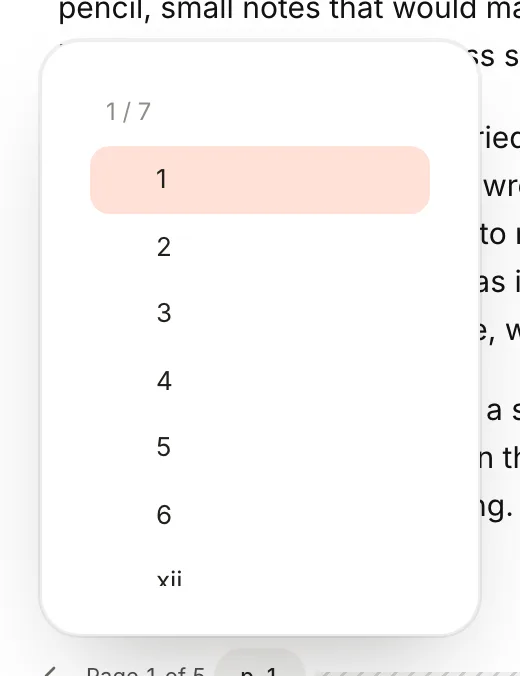
Many EPUBs carry the page numbers of the printed book, which is handy when a class or a citation says "see page 112". Click Go to page (it shows p. 1 once Terra knows where you are) or press ⇧⌘P, then type a page label and press Return, or click one in the list. Roman numerals like xii work.
Read footnotes without losing your place
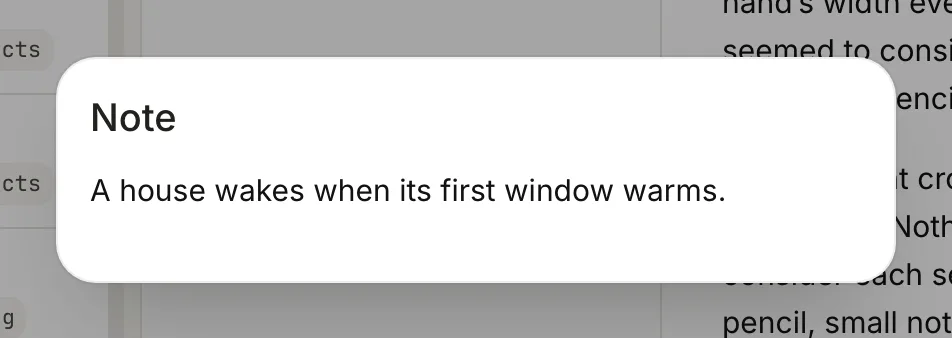
Click a footnote number and the note opens in a small window over the page. Press Esc to close it. If you followed a link somewhere else in the book instead, ⌘⌫ brings you back.
Pick up where you left off
You don't need to do anything. Close the book, quit Terra, come back next month — the book reopens on the paragraph you were reading.
Step 4Make the page comfortable
Every display choice lives in one menu, and each book remembers its own settings. Changing them never loses your place.
Click Reader appearance (the T at the top right of the page).
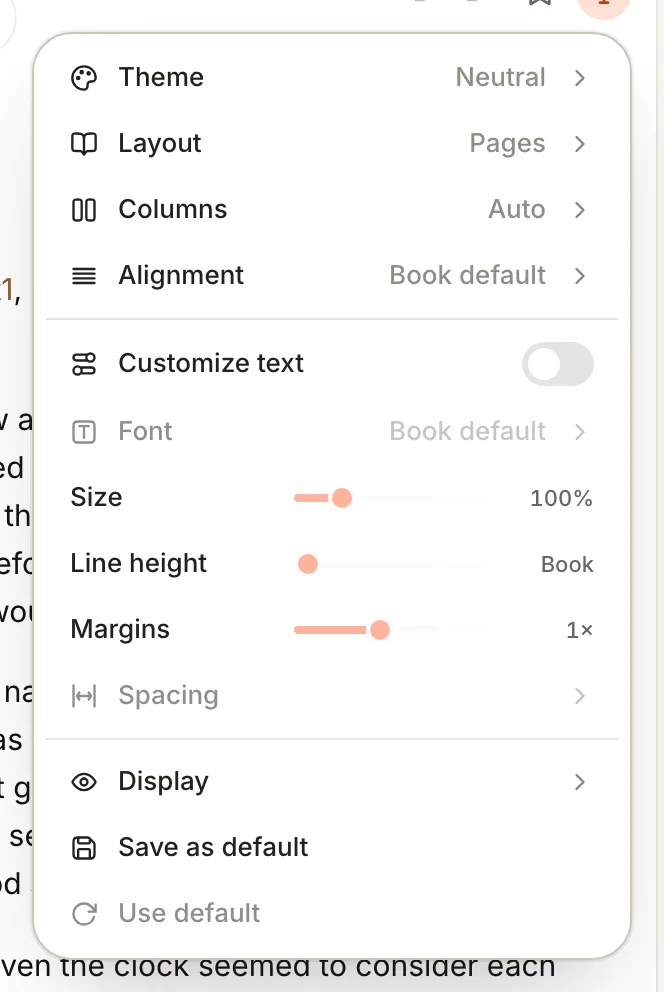
Reader appearance. Font and spacing unlock when you turn on Customize text. Choose a Theme: Neutral, Sepia, Paper, Mint, Night, High contrast, Yellow on black or Navy.
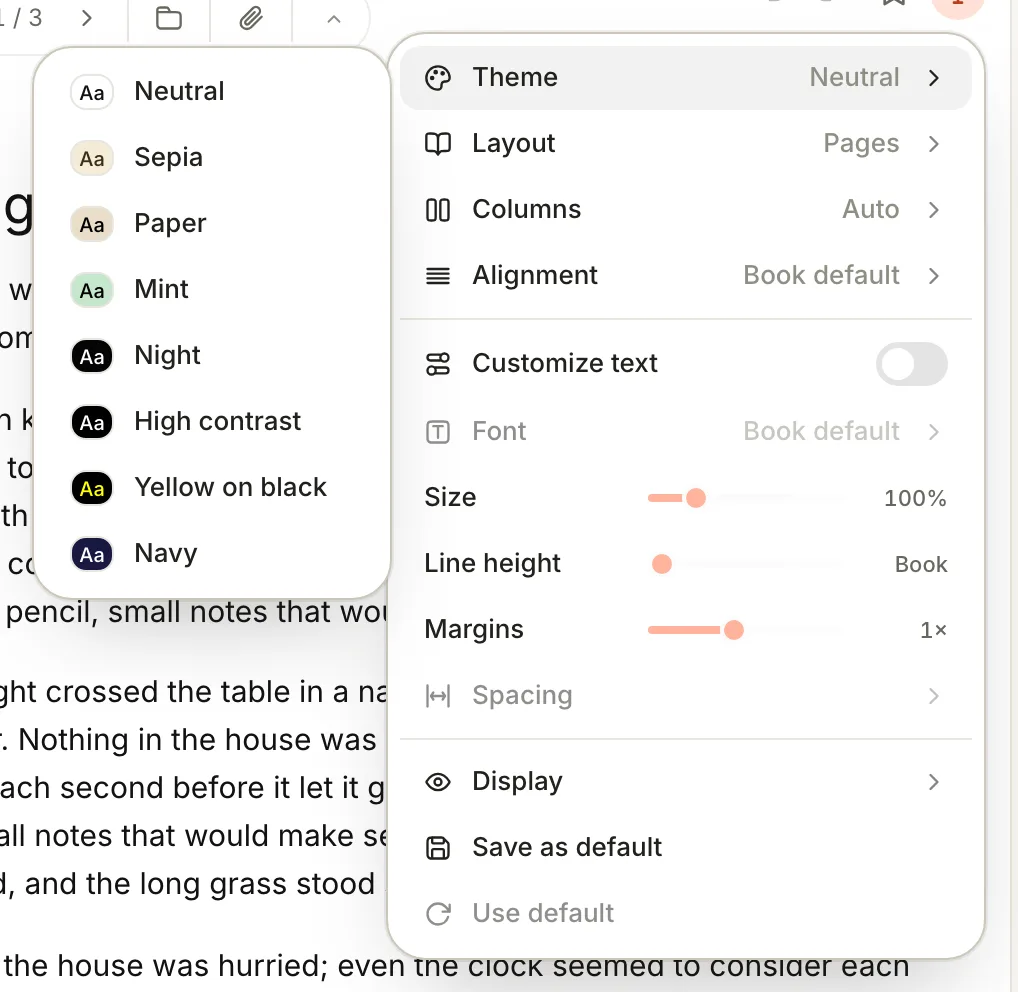
Eight themes. Night, High contrast, Yellow on black and Navy are dark. Choose a Layout: Pages turns pages like a book; Scroll gives you one long column per chapter.
Choose Columns: Auto shows two columns side by side when the window is wide enough, One never does, Two always does.
Choose Alignment: Book default, Justified (which also hyphenates long words) or Left.
To change the type, turn on Customize text. Now you can pick a Font — Open Runde, San Francisco, New York, Avenir Next, Athelas, Charter, Iowan, EB Garamond, Palatino, Georgia, Seravek or JetBrains Mono — and drag Size, Line height and Margins. Spacing adjusts the gaps between words, letters and paragraphs.
Under Display, switch extras on or off: Footnote popups, Page numbers in margin, Outline jump targets, Reduce motion, and — in dark themes — Dim images and Invert images for diagrams that glare.
Turn Customize text off any time to go back to the publisher's design. Terra remembers your custom values for when you switch back.
Clear everything else away
Press ⌥⌘Z for Zen mode, which hides the sidebar, the note list and the side drawers. Press it again to bring them back. For the whole screen, choose View › Enter Full Screen.
Step 5Read with your notes beside you
Reading goes further when you write as you go.
The book's own note. Click Show note (the paperclip in the floating tools) to open the book's note next to the page. It already has the title, author and cover; add your summary, a rating, tags or a status, and it shows up in your databases like any other note.
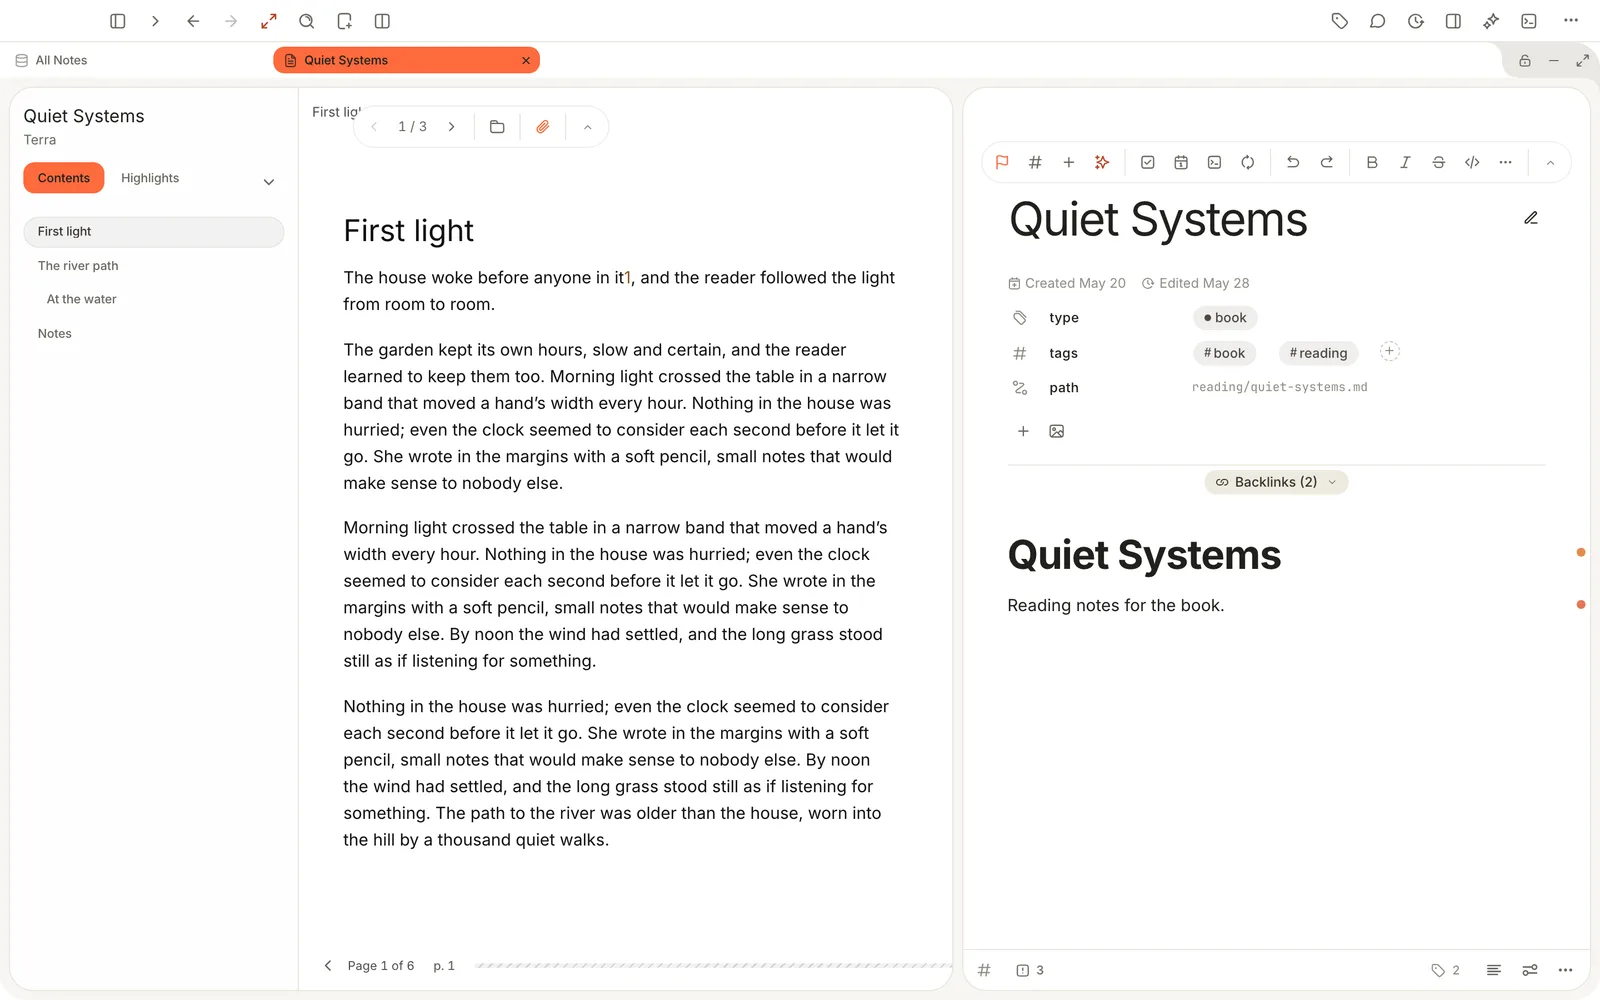
Show note puts the book's note beside the page. Write a summary, add tags, give it a status. A separate note, side by side. For long notes — a chapter-by-chapter summary, an essay you're drafting — open the book in one pane and your writing in another. Right-click the book in the note list and choose Open as › Right pane (in a database view it's Open in side › Right), then open your writing in the other pane. Find your way around has more on panes.
Step 6Bookmark your place
Press ⌘B or click Bookmark this page. A small mark appears in the margin and the button changes to Remove bookmark. Bookmarks are listed on the Bookmarks tab; click one to jump back.
To give a bookmark a name — "Start of the argument", "Quote for Thursday" — press ⌥⇧B instead, type a Name and click Save.
Highlights and bookmarks have a guide of their own: Annotate and keep every mark.
Features you might have missed
Search inside every book at once
Press ⇧⌘F and search your Library. Terra searches the text of your books too, not just their titles, so a half-remembered phrase finds the book it came from. The book opens where you last left it; there's no search within a single open book yet.
Picture books, comics and textbooks
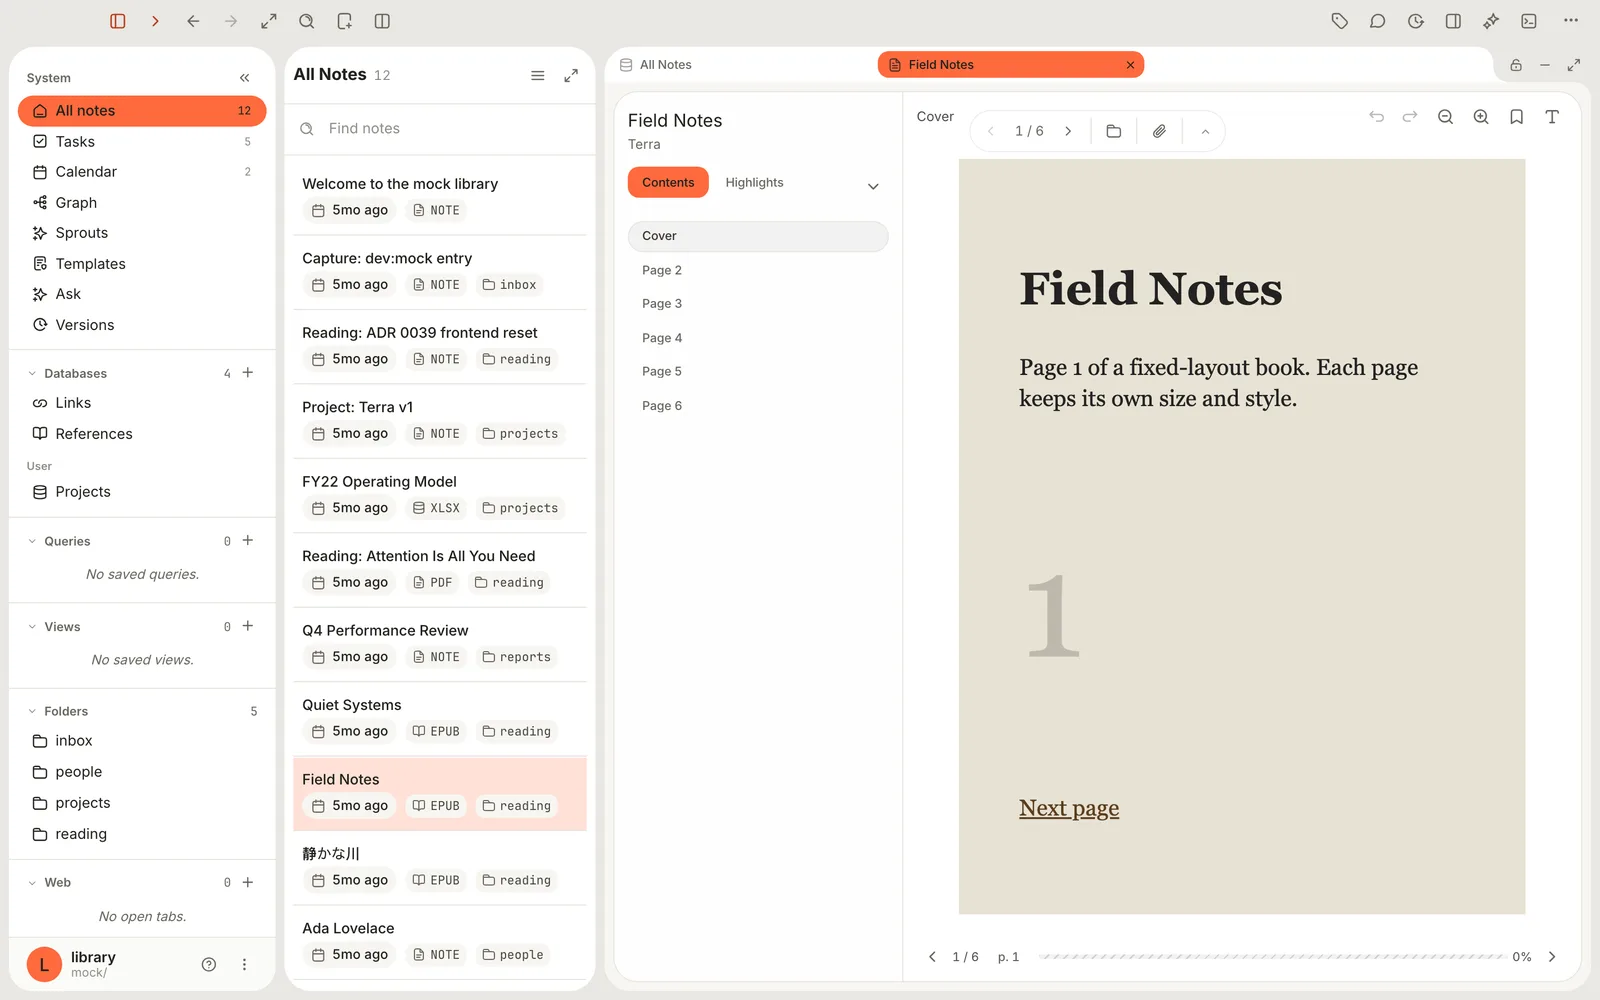
Some EPUBs are laid out page by page, like a magazine (a fixed-layout book). Terra shows these as real pages, with Zoom in and Zoom out at the top (⌘9 and ⌘8; ⌘0 fits the page to the window again), and Spreads instead of Columns in Reader appearance. You can bookmark these pages but not highlight them.
Japanese, Chinese and right-to-left books
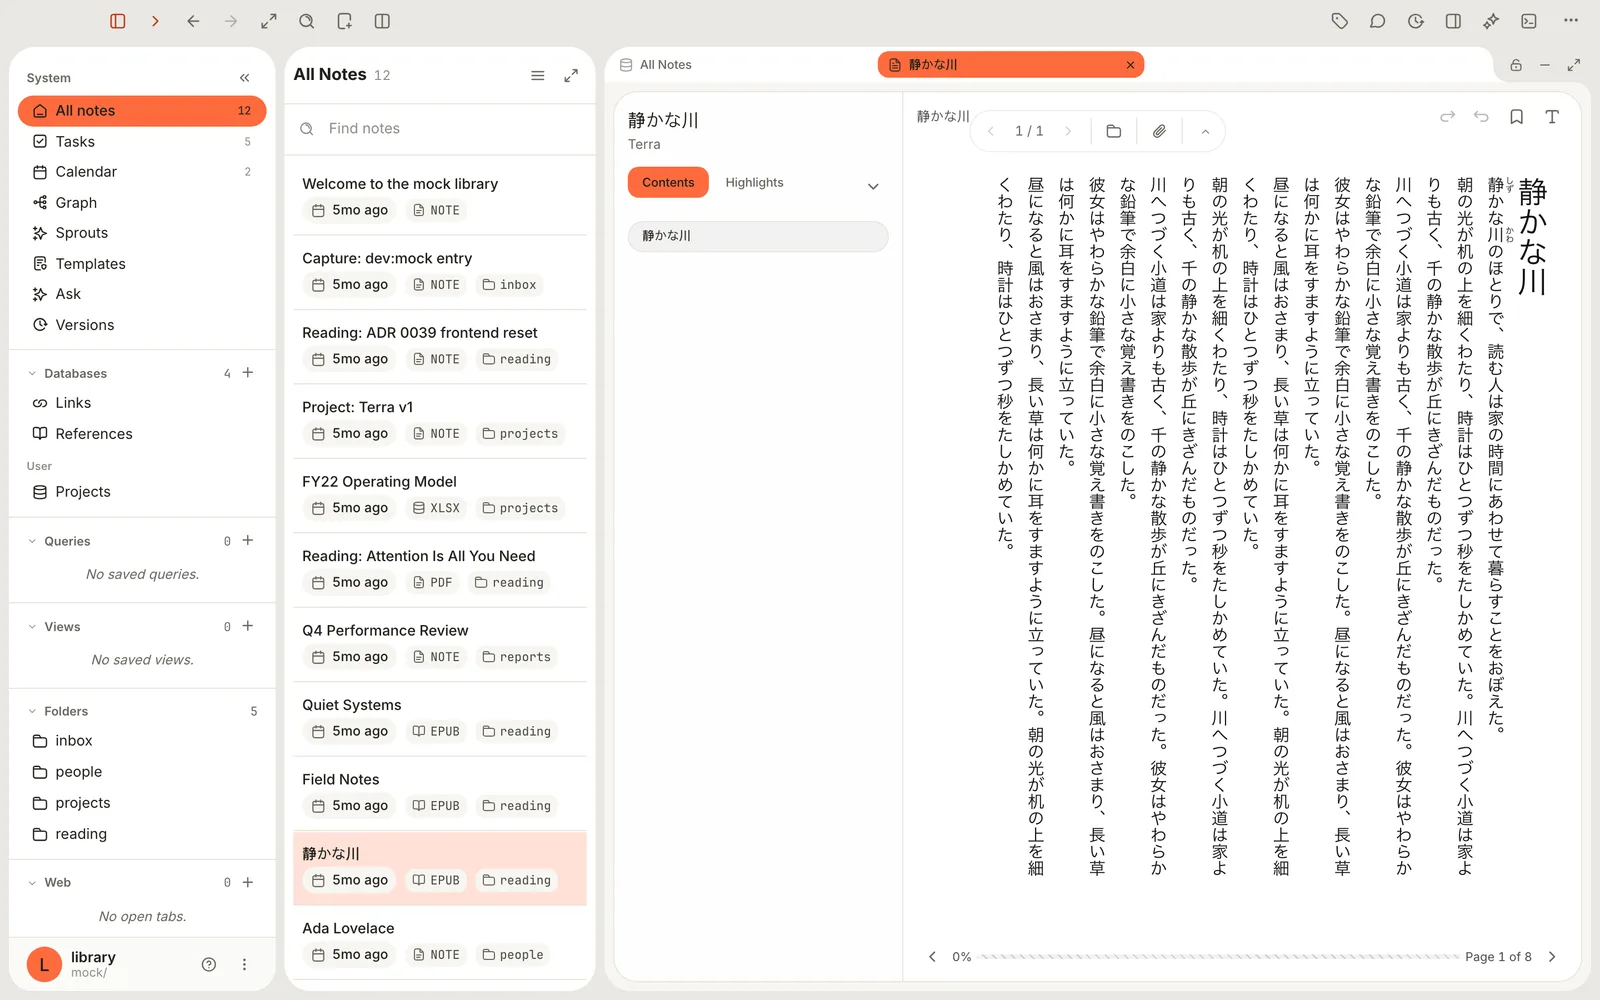
Vertical text reads top to bottom and right to left, just as printed. In right-to-left books the arrow keys follow the book's direction; turn off Display › Mirror arrows in right-to-left books if you'd rather they didn't. Display › Hide ruby hides the small reading guides above kanji.
Cite the printed page
Turn on Display › Page numbers in margin to see the printed edition's page numbers as you read, then cite the book in your writing with the real page. Book notes are ready to cite; see Build a research library.
Remap any reader key
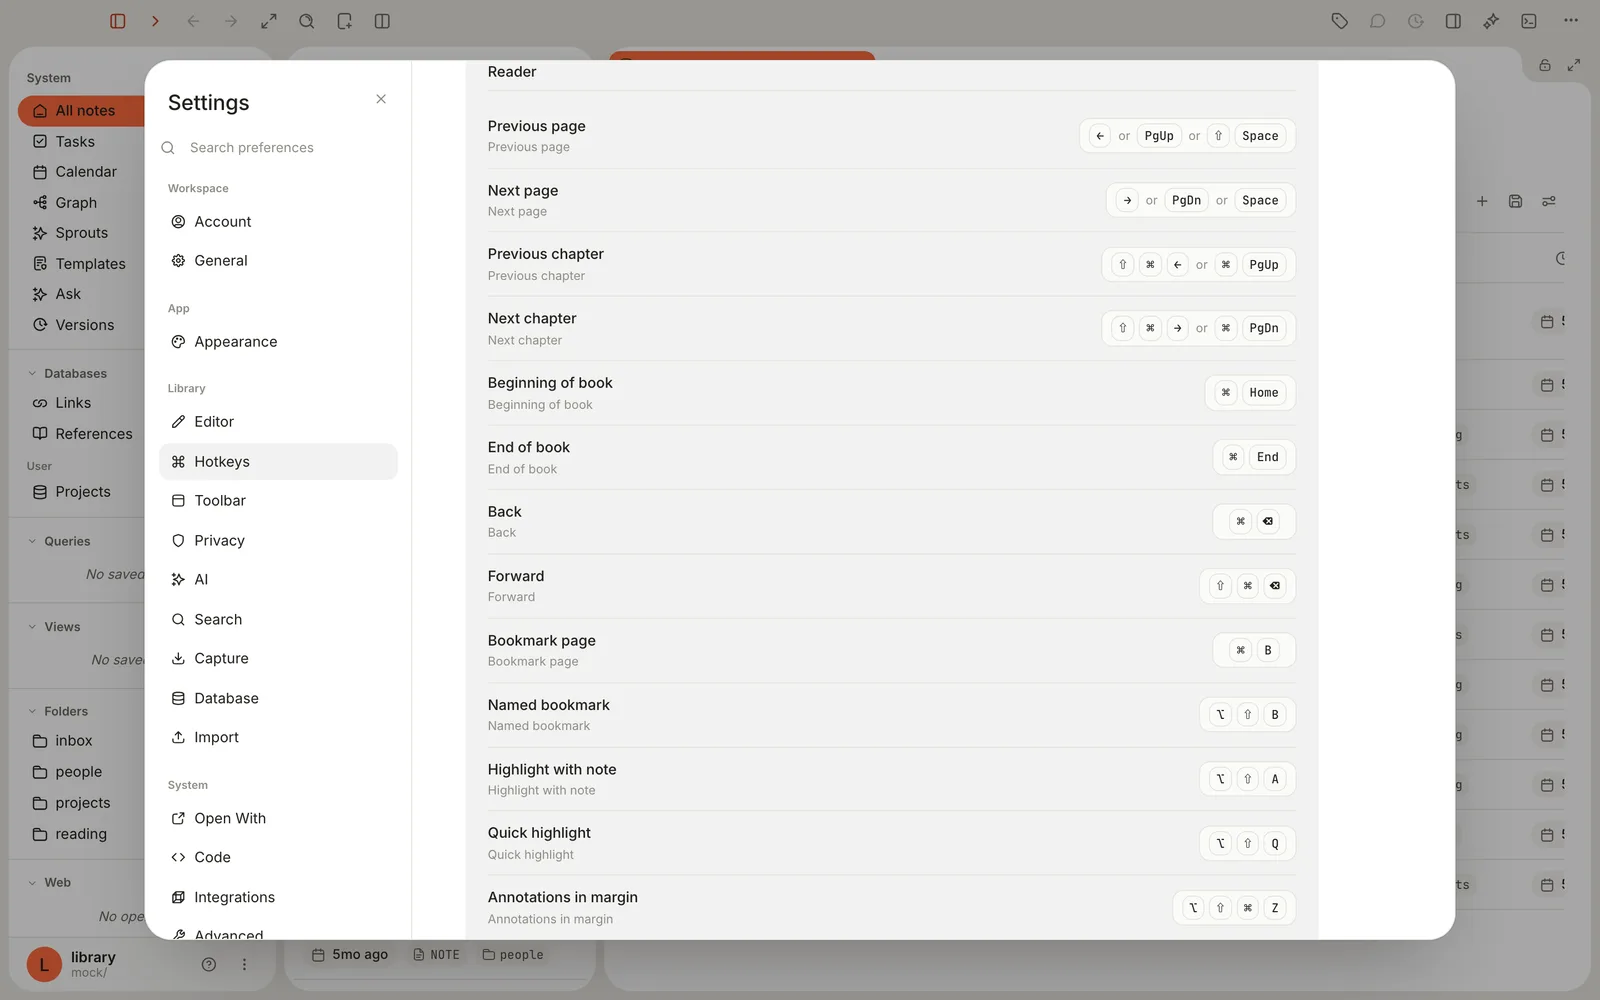
Every reader shortcut can be changed in Settings › Hotkeys, under Reader. Click a shortcut, press the new keys, and you're done; the new keys replace all of the defaults for that command. Reset to default puts them back.
New books follow your reading taste
The first time you open a book, it borrows the theme and font you chose for reading web pages and notes in Read mode, so everything you read in Terra looks consistent.
PDFs and images
PDFs open in Terra's PDF viewer. The floating tools let you turn pages, zoom (Zoom in, Zoom out), choose Page display — One page, One page continuous, Two pages or Two pages continuous — and switch on Highlight text or Markup to mark up the page. Unlike book highlights, PDF highlights are saved into the PDF file itself, so they also show up in Preview. Annotate and keep every mark covers both. A PDF opens on page 1 each time; it doesn't remember your place yet.
Images open fitted to the window. Use Copy image to clipboard or Reveal in Finder in the floating tools.
Troubleshooting
The arrow keys don't turn the page
Click once on the page. The reader only listens to the keyboard when it has focus, and it ignores keys while you're typing in a field or a menu is open.
I copied a book into my Library folder and it doesn't appear
Terra only adds EPUBs that you drag into its window. Drag the file from Finder onto the Terra window or onto a folder in the sidebar.
"Encrypted EPUB — This book cannot be previewed"
The book is protected by DRM. Terra can't open protected books. Look for a DRM-free edition.
"Page 3 of 7" doesn't match the percentage
The page count is for the current chapter. The bar and the percentage show your progress through the whole book.
A web link in the book does nothing
For safety, Terra removes links to websites and remote content from books. Links within the book still work.
"Book unavailable"
Terra couldn't read the book's data file — it may be damaged, or it was saved by a newer version of Terra. Update Terra; if that doesn't help, see what to do with the data file.
What's next
- Annotate and keep every mark — highlights, notes, tags and exports.
- Build a research library — cite books and papers in your writing.
- Find your way around — split panes so the book and your writing sit side by side.
Was this guide helpful?