Get answers from your own notes
Ask questions in plain language and get answers that cite your notes. Let the assistant write for you, with every edit reviewable.
You wrote it down somewhere. A decision from last spring's planning meeting, a quote from a paper, the name of the contractor who fixed the roof. Search finds words, but sometimes you only remember the idea.
Terra Agent reads your Library for you. Ask a question the way you'd ask a colleague and it searches your notes, reads the ones that matter and answers with links back to them. When you want more than an answer — a summary filed as a new note, a follow-up added to a project page — it can write too, and nothing changes unless you allow it.
How it fits together
There are two doors into the same conversation:
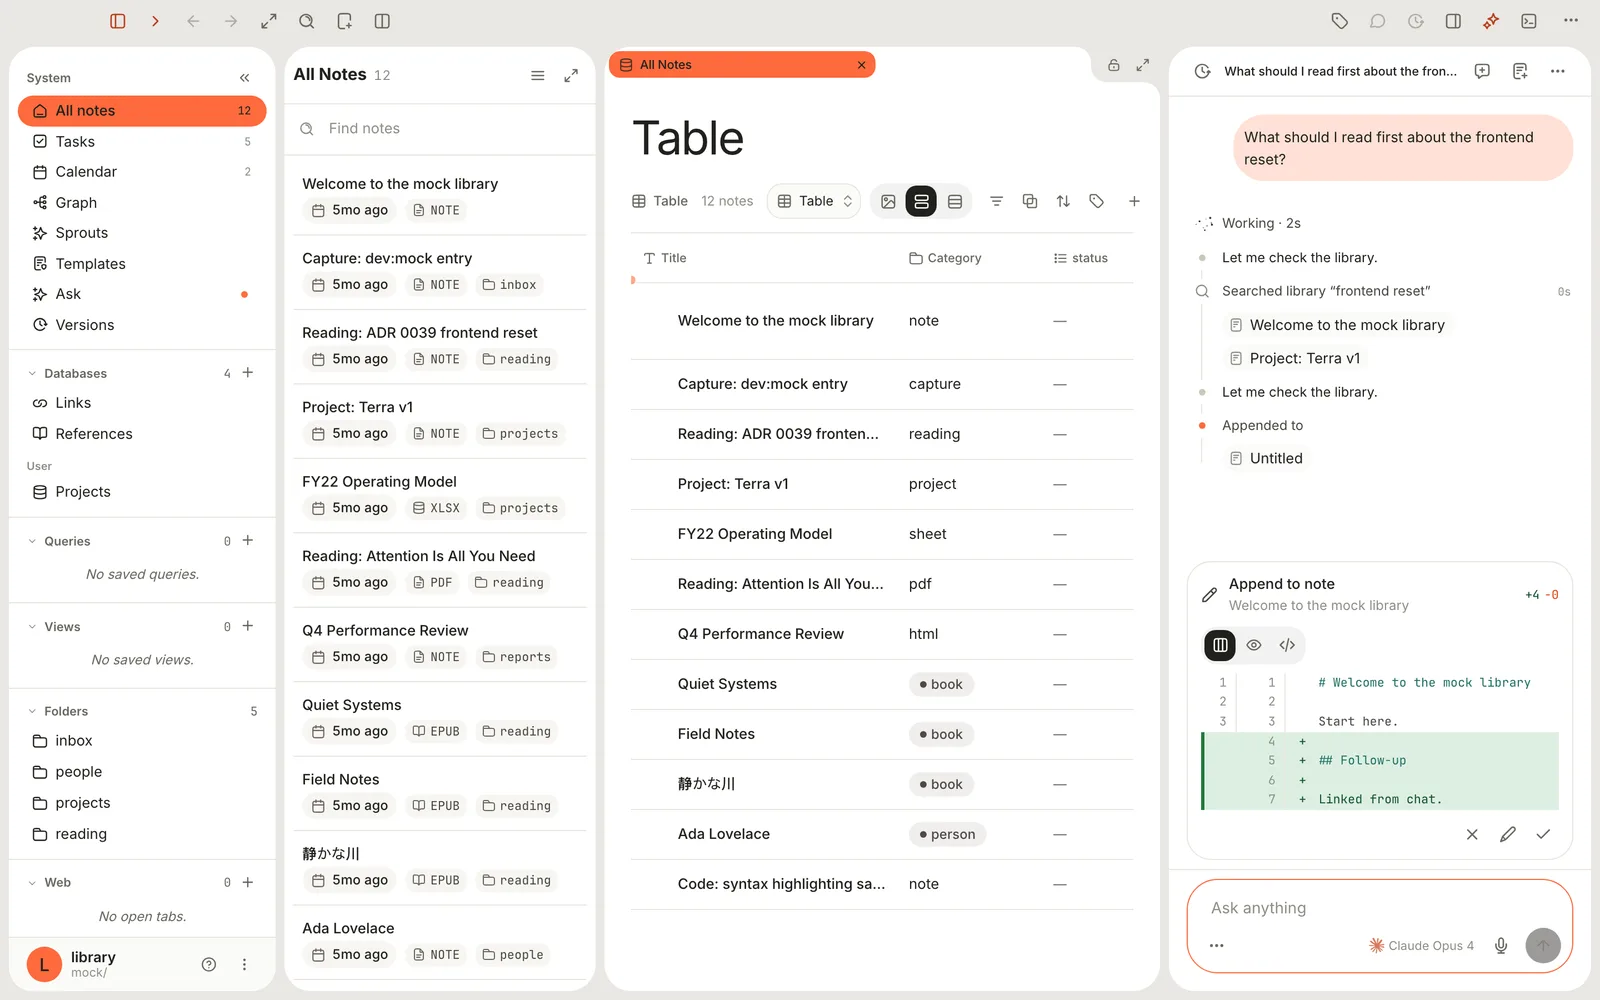
- AI conversations in the toolbar opens the chat as a drawer on the right, next to whatever you're working on. Handy when a question is about the note in front of you.
- Ask in the sidebar opens the chat as a full page, with your chat history in the column beside it. Better for longer sessions.
A reply keeps streaming if you switch from one to the other. Each chat is saved inside your Library, in .terra/conversations/, so your conversations travel with your notes and never show up as notes themselves.
The assistant has tools for working with your Library — search, read, create, edit, append — and a mode that decides which of those run without asking you first. You'll set that in step 4.
Step 1Connect an AI provider
Terra doesn't ship its own model. You bring one, and you can connect several and switch between them.
Open Settings: press ⌘, or choose Terra › Settings…. (The ⋯ Library menu at the bottom of the sidebar has Library settings… too.)
In the list on the left, under Library, click AI.
Scroll to Add provider and click the service you use — Claude, OpenAI, Gemini or OpenRouter for most people.
macOS asks Allow AI provider connection? and spells out the arrangement: who runs the model, who pays, and that your prompt and selected notes may leave this Mac. Click Allow. The provider joins the list under Providers.
On the provider's row, click the link icon (Connect):
- Claude, OpenAI or Gemini: paste your API key into API key and click Connect.
- OpenRouter: Terra opens your browser to sign in to OpenRouter; approve, then come back. Prefer a key? Click the key icon (Paste API key) instead and paste a key that starts with
sk-or-.
The status line at the bottom of the pane reads Connected Claude. (or the provider you picked), and the row's icon changes to Disconnect.
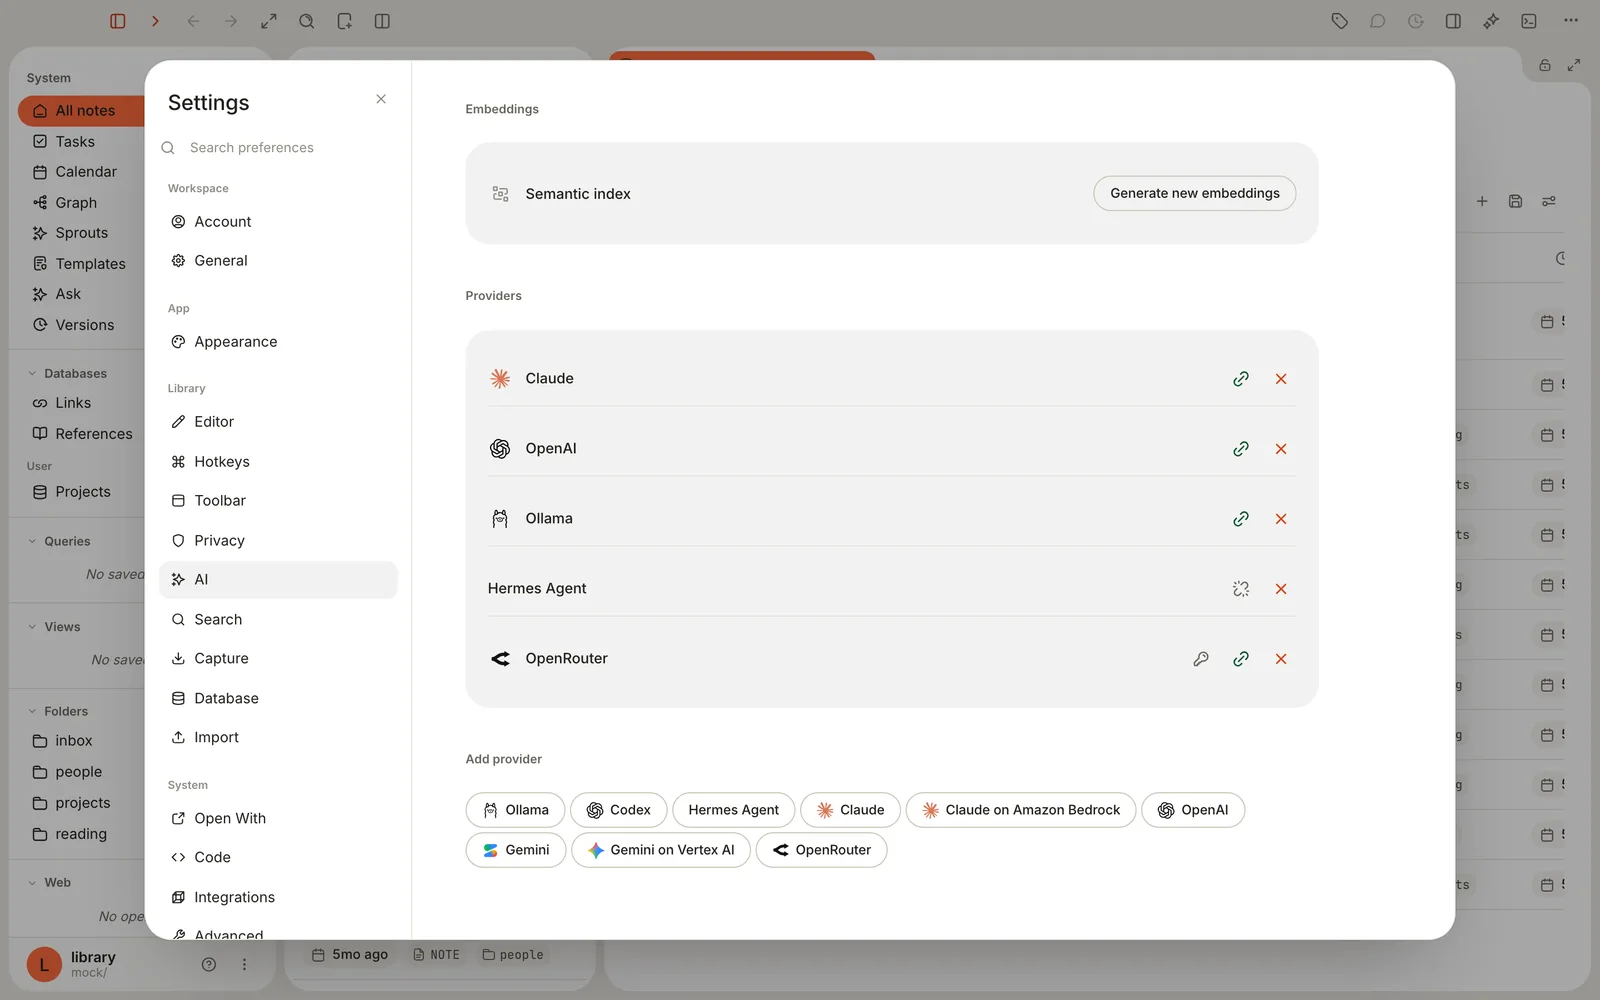
Connected providers are listed under Providers. Add another from the buttons below the list. Scroll back up to Defaults. In the Chat row, choose the provider, then choose a Model. New conversations, the editor's AI menu and inline rewrites use it.
Using Codex or Hermes Agent instead of an API key
If you've installed and signed in to the Codex or Hermes Agent command-line tool, click Codex or Hermes Agent under Add provider, click Allow, then click Connect on its row. Terra finds the program, shows a second macOS alert describing exactly what it will run, and connects once you click Allow. These tools use their own sign-in and model provider, so your prompts still go to that provider. After you update the tool, click Connect again to approve the new version.
Step 2Ask your first question
Say you're picking a project back up after a few weeks away and want to know where you left it.
Click Ask in the sidebar. The Ask page opens with a greeting and a box that says Ask anything.
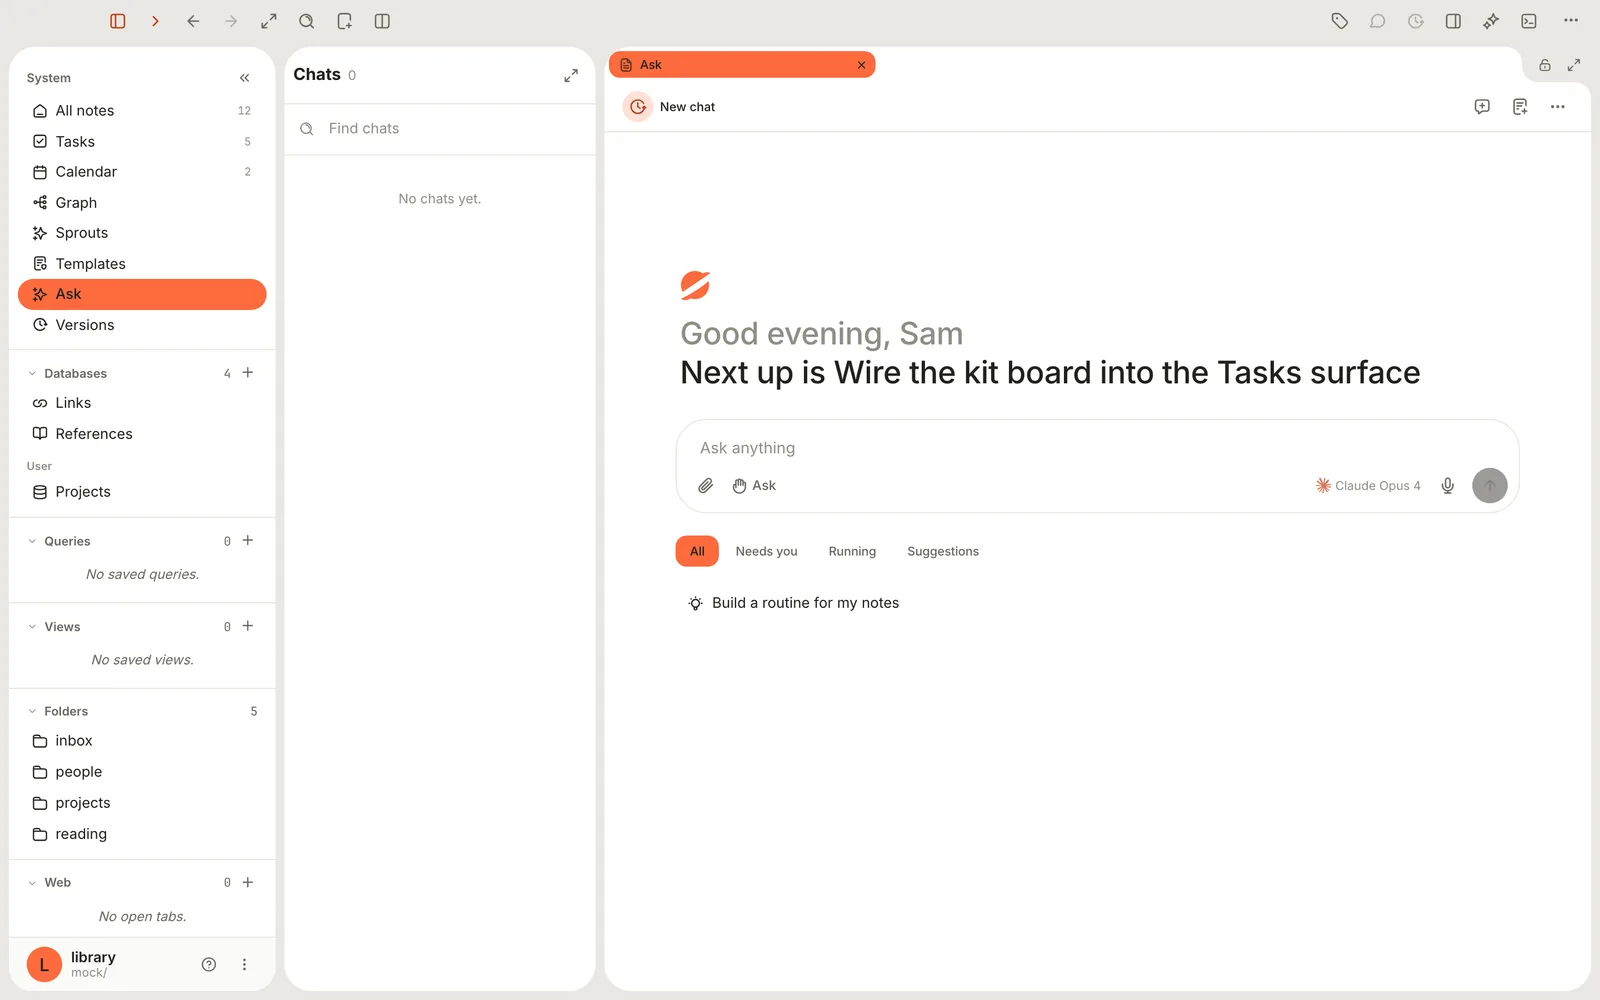
The Ask page. Your past chats are listed in the Chats column on the left; tabs below the box collect chats that need you, replies still running and suggested prompts. Type a question in plain language. For example: What did we decide about the launch date, and who owns the press kit?
Press Return to send. (⇧Return starts a new line instead.)
Watch the activity line above the answer. It reads Working while the assistant searches and reads, and lists each step: Searched library "launch date", Read, and so on, with the notes it touched.
Read the answer. Wherever it relies on a note, you'll see a small note chip. Hover a chip to preview the note, or click it to open the note.
Questions that name specific things — a project, a person, a date range — get better answers than vague ones, because the assistant starts from a search of your Library.
Step 3Give it the right context
The assistant searches on its own, but you can save it the guesswork by handing it exactly what you mean.
Click the paperclip (Attach) under the message box.
Choose where the context comes from:
- Search library — type a few letters of a note's title and pick it.
- Local file — pick a file from your Mac. Text files (Markdown, plain text, CSV, JSON, code and similar) and images attach directly.
- On screen — in the drawer, attaches the note you're looking at. (On the Ask page there's nothing beside the chat, so it reads Nothing on screen.)
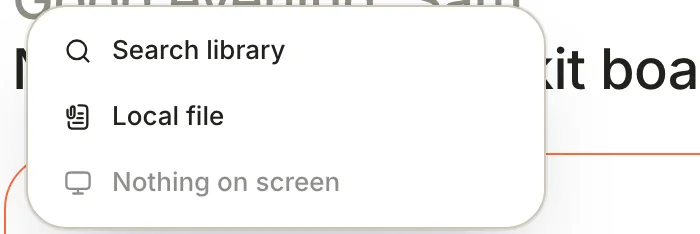
Attach a note from your Library, a file from your Mac, or whatever is open next to the chat. Attached items appear as chips above the message. Click × on a chip to remove it.
In the drawer, the same choices live behind the ⋯ button next to the model name.
Step 4Decide how much it can do on its own
Reading and writing notes are actions, and you choose which ones need your say-so. The setting is called the mode, and it applies to the whole Library on this Mac.
On the Ask page, click the mode button under the message box. It starts as Ask. (In the drawer: ⋯ › Mode.)
Pick a mode:
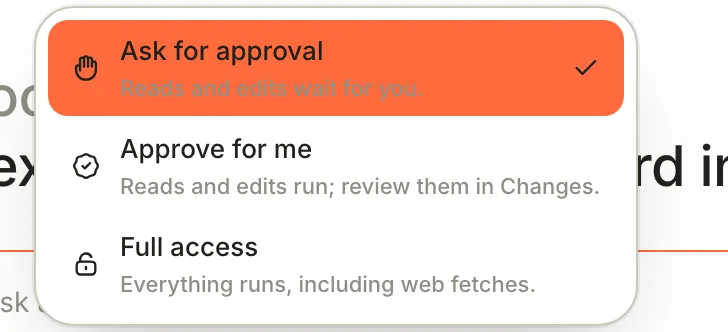
Three modes. Ask for approval is the default and the safest place to start.
| Mode | Reading and editing notes | Opening web pages |
|---|---|---|
| Ask for approval (default) | Each action waits for you | Asks every time |
| Approve for me | Runs, and every edit is listed under Changes | Asks every time |
| Full access | Runs, and every edit is listed under Changes | Runs |
- If you raise the mode, macOS asks you to confirm — for example Let the assistant edit without asking? Click Allow. Lowering the mode never asks.
Whatever the mode, the assistant can't delete notes or empty the trash.
Step 5Approve, edit or deny a change
In Ask for approval mode, when the assistant wants to act, a card appears above the message box naming the action — Read note, Append to note, Edit note, Create note — and the note it affects.
Look at what it wants to do. For edits, the card opens on a diff: green lines are being added, red lines removed. Use the buttons at the top of the card to switch between the diff, a rendered Preview of the note, and the exact Call the assistant made.
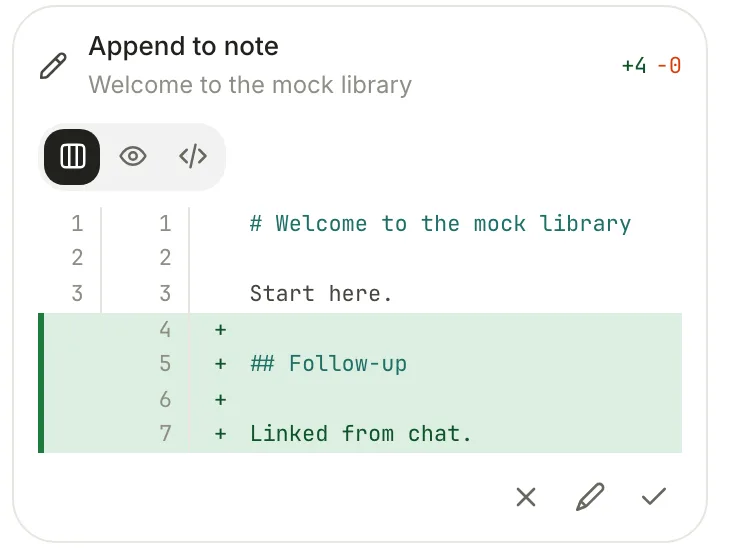
An approval card. The pencil lets you change the text before it's written; the check approves; the cross denies. Choose what happens:
- Approve (✓) — let it go ahead.
- Deny (✕) — refuse. The assistant is told you declined and carries on without it.
- Edit before approving (pencil) — rewrite the text yourself, then click Approve edit. Available when it creates, edits or appends to a note.
- Allow reads in this chat — for read requests, approves this read and every later one in the same chat, until you quit Terra.
If several actions are queued, the card shows how many are waiting. Work through them one at a time.
Step 6Review and undo its edits
Every edit the assistant makes in a chat is recorded, before and after, so you can check its work and take any of it back.
In the chat's header, click ⋯ (Chat options) and choose Changes. It shows a count like +4 −0, and is greyed out until the assistant has edited something.
The Changes pane opens beside the chat. The left side lists Changed notes; click one to see its diff.
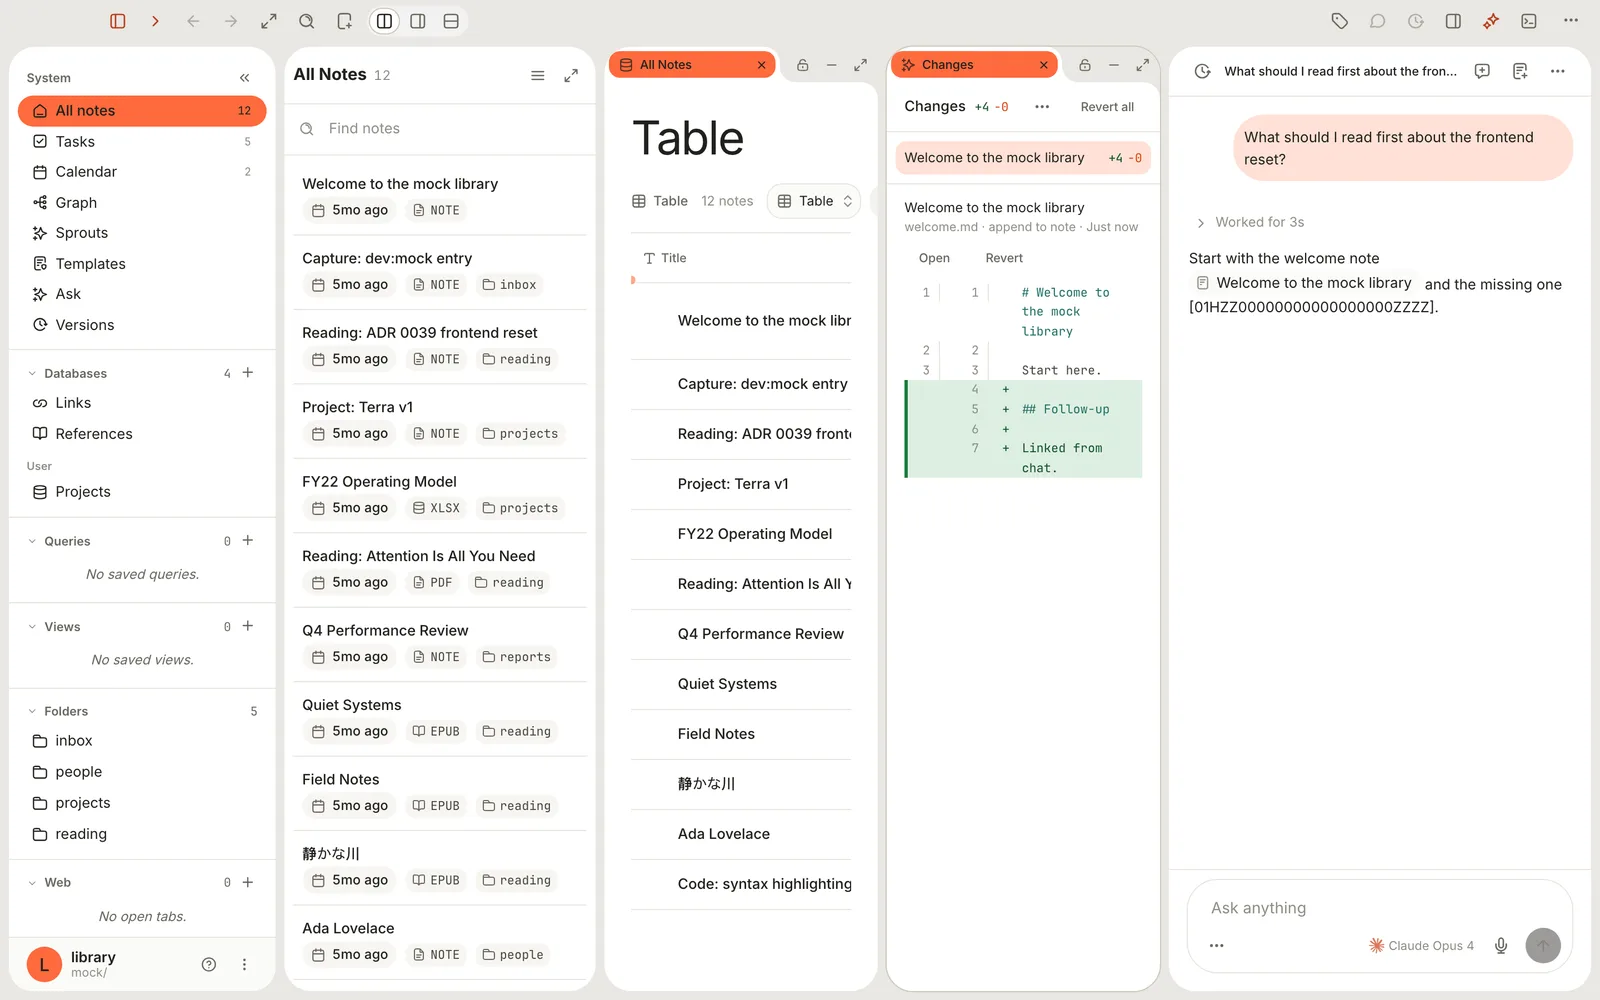
Changes lists every note the assistant edited in this chat. Revert undoes one note; Revert all undoes everything, newest first. Click Open to jump to the note, Revert to undo that note's change, or Revert all at the top to undo everything from this chat.
A revert won't overwrite work you did afterwards: if you've edited the note since, Terra says the note changed and leaves it alone.
Step 7Keep the conversation
Some conversations are worth keeping as notes — a research summary, a plan you talked through.
- Make a note (the page-with-plus button in the chat header) turns the whole chat into a note in your Inbox, with your questions and the answers under headings, and opens it.
- Chat history (the clock at the left of the header) lists earlier chats. On the Ask page they're in the Chats column; right-click one for Convert to note or Delete.
- Double-click a chat's title to rename it. Chat options also has Rename, Archive and Delete.
Features you might have missed
Talk instead of type
Click the microphone beside the send button (Voice input) and speak. Your words appear in the box; pause or click again to stop, then press Return. The first time, macOS asks for permission to use the microphone and speech recognition. When macOS supports your language, speech is recognised on your Mac.
See more, or less, of the work
Chat options › Transcript view changes how much of each answer's working you see: Normal folds the steps away once the answer lands, Summary shows one line, Verbose opens every step with its input and result, and Thinking adds the model's reasoning.
Pick a model per chat
Click the model name under the message box to switch models for this chat only. New chats go back to your default.
Give the assistant a personality
In Settings › AI, the Terra Agent section has a Default provider, a Default model and a System prompt — standing instructions such as "Answer in British English" or "Always end with next steps". They apply to new chats.
AI where you write
In any note, the AI button in the editor toolbar offers Continue writing, Improve writing, Fix grammar and Summarize. Select some text first for Improve writing and Fix grammar; Summarize works on a selection or the whole note, and Continue writing picks up after the paragraph you're in.
Plain-English queries
In a Query, type what you want into Describe the query you want… and click Generate. Terra writes the SQL for you and checks it only reads.
Ask about Terra itself
The assistant can search Terra's built-in help. Ask "how do I make a board from my projects?" and it answers from the help articles.
Use your Claude, ChatGPT or Gemini subscription
In the drawer, Chat options lists Claude, ChatGPT and Gemini. Pick one to use that service's own website inside the drawer, signed in with your account. Pick Terra to come back. These chats live on the vendor's site and can't see your Library.
What leaves your Mac
Terra sends your AI provider what the model needs to answer: your message, anything you attach, short passages from notes it found (up to eight), and the text of any note or web page the assistant reads while it works. After a reply, Terra also asks a smaller model from your Defaults › Chat provider to pick facts out of the answer, which it stores in your Library to improve later recall.
Things that don't leave your Mac: your API keys (they're in the Keychain), notes the assistant doesn't touch, and — if you build it without an Embedding default — the semantic index. Codex and Hermes Agent send your prompts through their own provider.
Troubleshooting
It says "No AI connection"
Connect a provider first: click Open AI settings, or follow step 1.
My providers disconnected after I moved my Library
Provider approvals and keys belong to this Mac and this Library's folder location. Moving or renaming the Library folder, or opening it on another Mac, disconnects them. Click Connect on each provider and paste its key again.
"Another chat is still replying"
Terra runs one reply at a time. Your message stays in the box; send it when the other chat finishes. There's no stop button yet — a reply ends when the model finishes.
The assistant answers but never edits anything
The model you picked may not support tools. It can still answer from the notes Terra finds for it. Switch to a model that supports tool use — a current Claude, GPT or Gemini model — with the model button.
I connected Ollama but can't pick it for chat
In this version, Terra offers Ollama models for the semantic index (Defaults › Embedding) only. Use a hosted provider for chat.
"Couldn't attach …"
Only images and text files attach directly. Add PDFs and other files to your Library first, then attach their notes. Images also need a model that can read images.
"Request too large" or "AI cost cap reached"
Terra refuses a single request that would send more than about 150,000 tokens — attach less, or ask about fewer notes at once. It also pauses a provider when the day's spending passes a safety limit; the limit resets daily.
macOS asks "Allow exact agent action?" even in Full access
A few lookups into Terra's own knowledge of your Library still ask every time, whatever the mode. Opening a web page asks too, unless you're in Full access. Each approval covers that one call only.
What's next
- Capture anything and let Terra file it — the same providers power capture enrichment.
- Find anything with search — when you know the words, search is faster than asking.
- Templates — the assistant can create notes from your templates.
Was this guide helpful?