Make Terra yours
Choose light or dark, a theme and fonts, put your own buttons on the toolbar and your own keys on commands, tidy the sidebar, and give one note its own page.
You'll spend a lot of hours in Terra, so it should feel like your own desk: the colours you like, text at a size you can read late in the evening, the buttons you reach for most, and nothing you never use.
This guide follows one setup from start to finish. You're running the launch of a pocket field guide to the birds of the lower valley, often after dark, so you'll switch to a dark theme, make the text a little bigger, give the launch plan its own toolbar button, and set up a few keys. Every step stands on its own, so skip to the part you want.
How it fits together
Almost everything here is in Settings: press ⌘, or choose Terra › Settings…. Most changes apply the moment you make them, with no Save button.
Most settings belong to the Library that's open, so a work Library and a personal one can each look their own way. They're saved in the Library's hidden .terra folder and travel with it. A few things stay with this Mac instead:
| What | Applies to |
|---|---|
| Light, Dark or System | Every Library on this Mac |
| Interface style, theme, accent, app icon, fonts, sizes, toolbar and shortcuts | The Library that's open |
| How the sidebar is arranged, and your reading theme and text size | This Mac |
| A note's own page width and font | That note, wherever it goes |
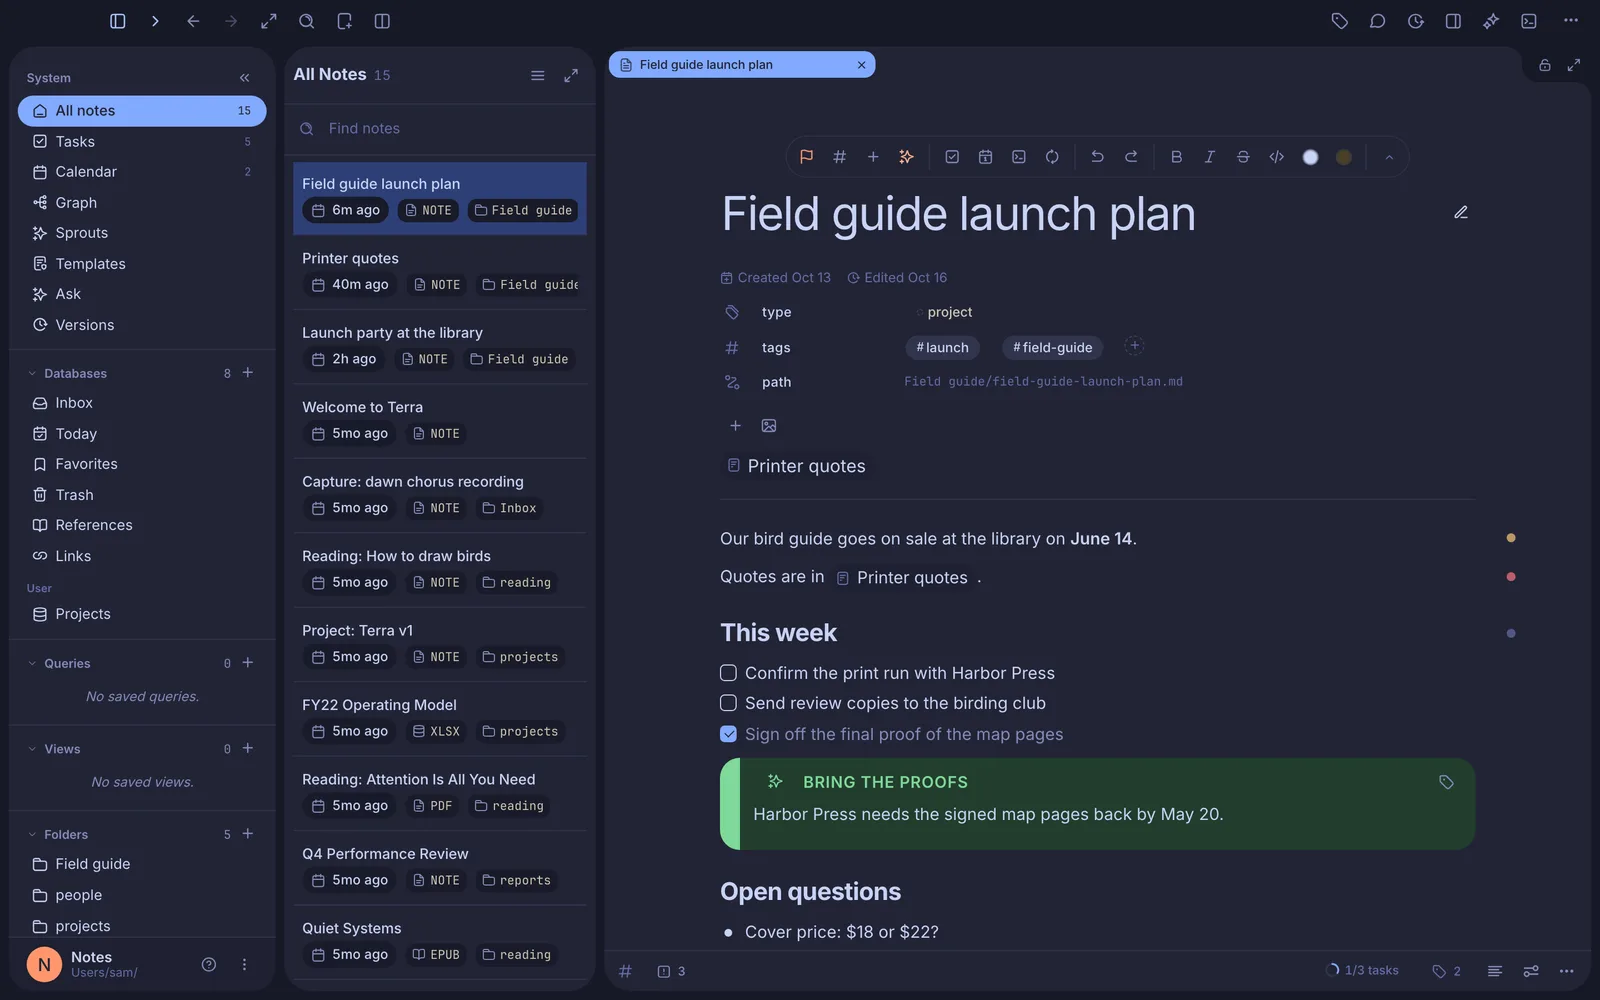
Step 1Choose light or dark, and an interface style
The top of the Appearance pane sets the overall look.
Press ⌘, and click Appearance.
Click Light, Dark or System. System follows macOS, so Terra turns dark when your Mac does.
Under Interface style, choose how controls are shaped. It changes their feel, not their colours:
- Modern (the default): curved, flat, organic.
- System: compact and minimal.
- Glass: fluid, with translucent surfaces. On Macs that support it, the toolbar becomes a native macOS toolbar.
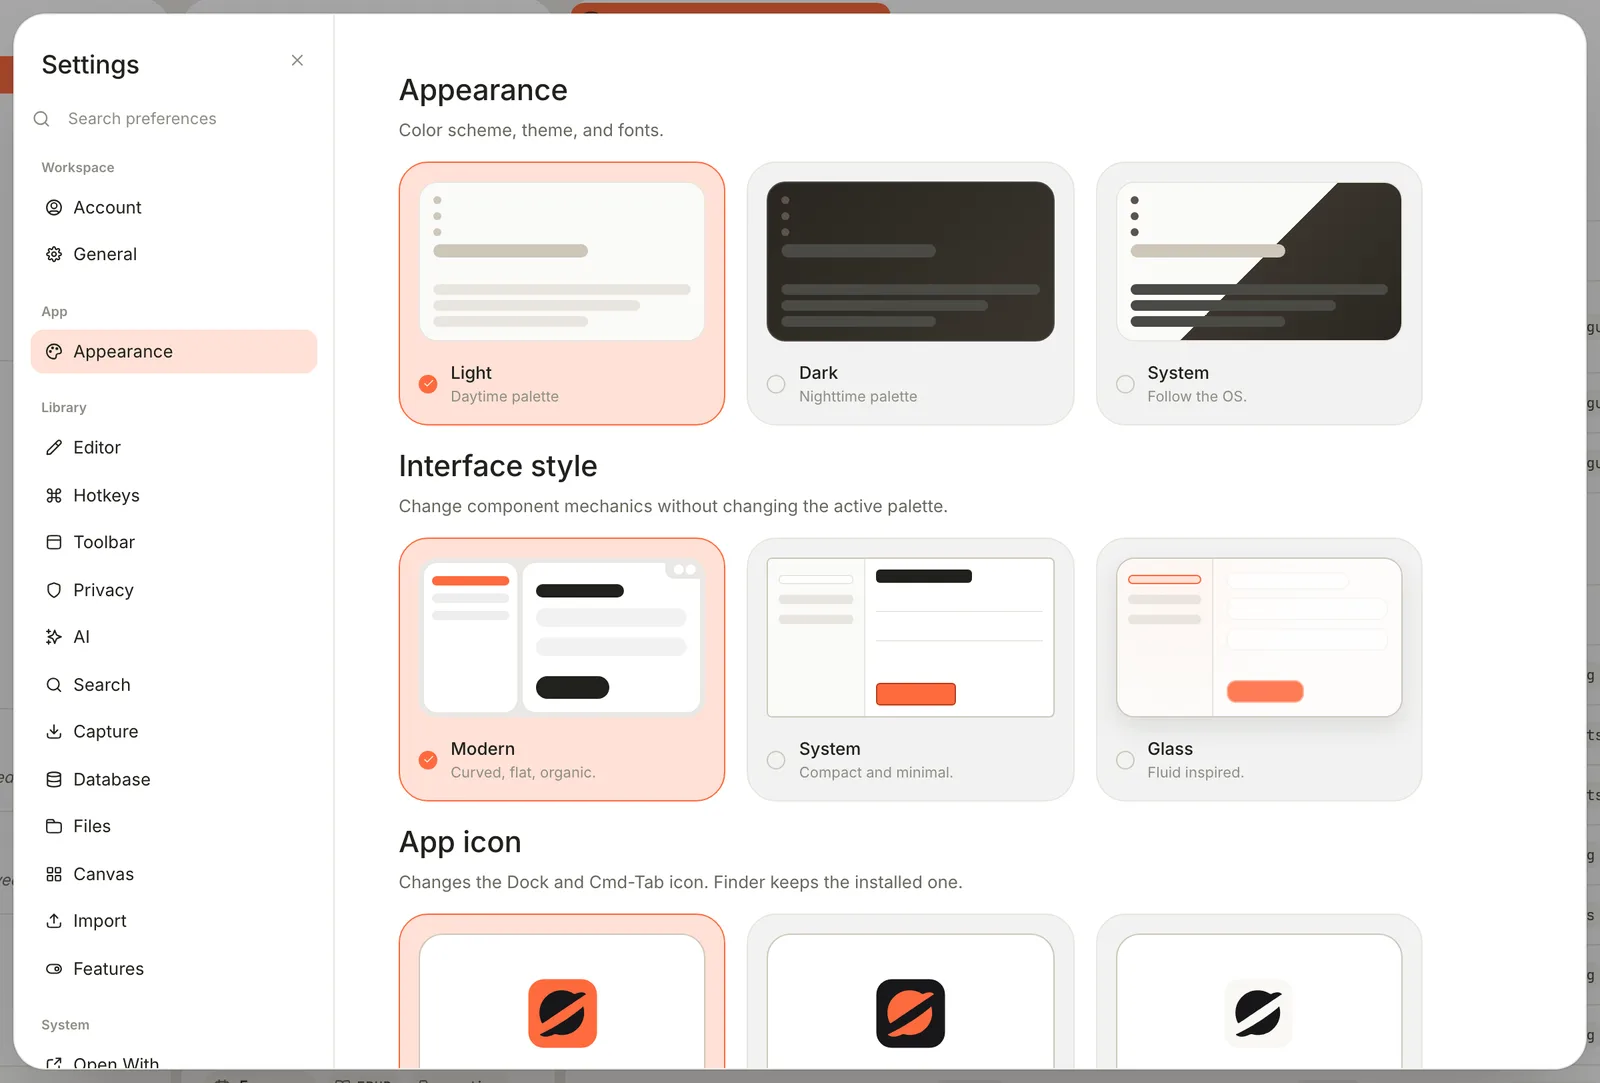
Light or dark applies to every Library; the interface style belongs to this one. Under App icon, pick Orange, Midnight, Paper or Ink for the icon in the Dock and the app switcher. Finder keeps showing the icon Terra was installed with.
To flip between light and dark without opening Settings, press ⇧⌘L, or choose View › Appearance › Toggle Light / Dark.
Step 2Pick a theme and an accent
A theme sets every colour in the window. Terra comes with sixteen: Terra, Catppuccin, Gruvbox, GitHub, One, Ayu, Night Owl, Synthwave '84, Blade Runner 2049, Eldritch, Cobalt2, Citron, Pulse, Dracula, Monokai and Tokyo Night.
In Appearance, scroll to Theme and click a card. The window changes straight away.
A card that says Light + Dark follows your choice from step 1. A card that lists flavors has more than one version: right-click it and pick one. For the evening sessions, right-click Tokyo Night and choose Moon.
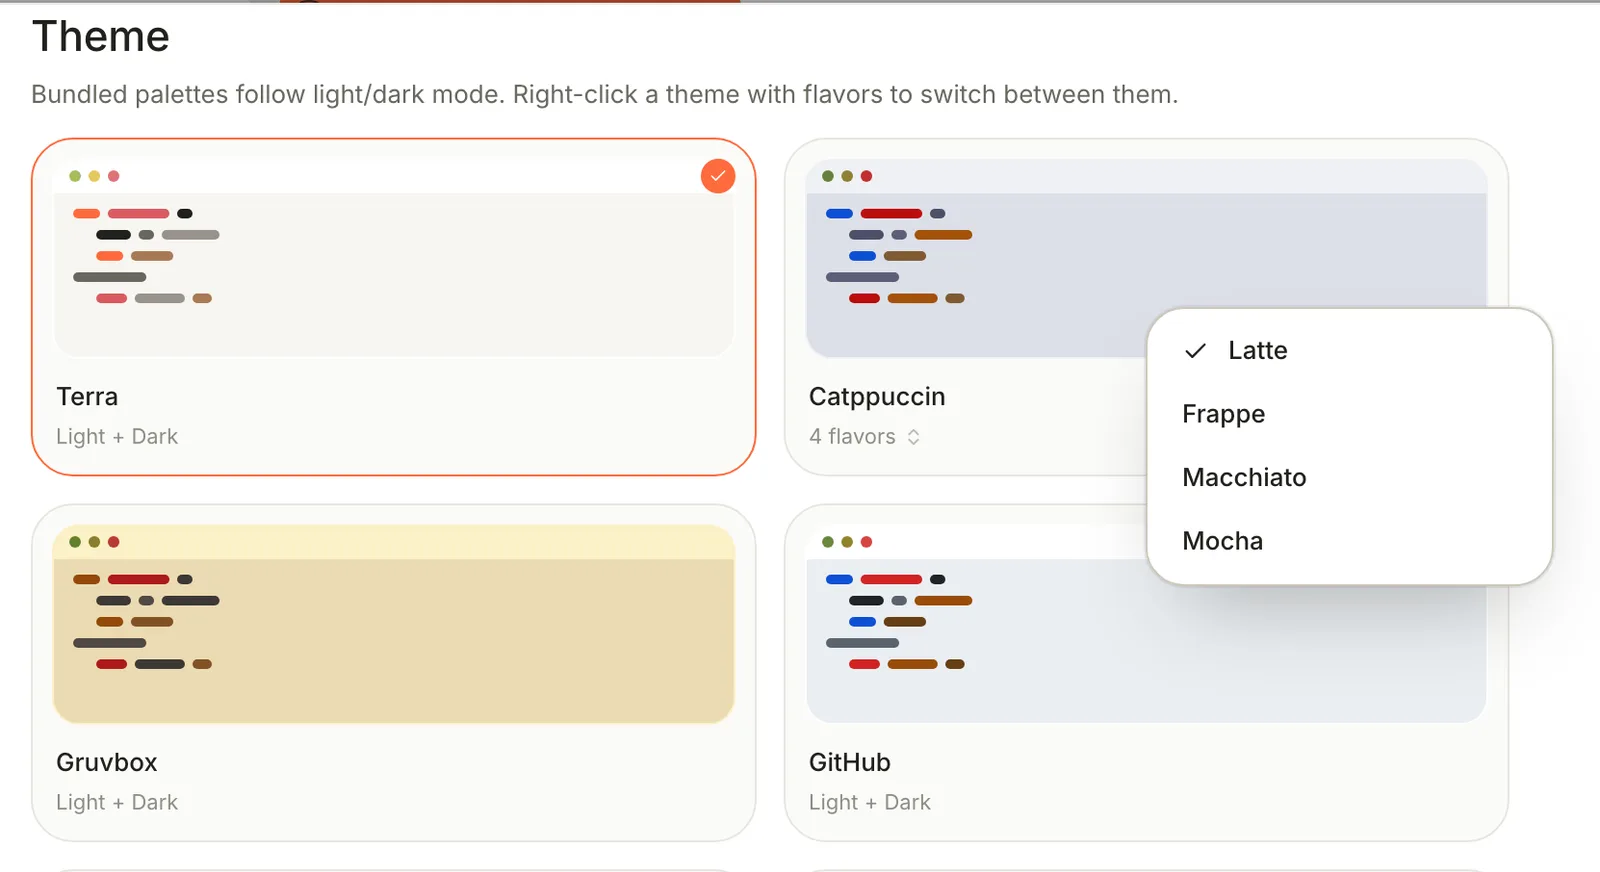
Right-click a theme with flavors to choose one. Under Accent, click a swatch to change the colour of highlights and selected items. Picking another theme resets the accent to that theme's own.
Some flavors are made for one scheme only. Tokyo Night's Moon is dark, so choosing it makes Terra dark whatever step 1 says.
Step 3Set the fonts and sizes
Text you can read comfortably matters more than any colour.
In Appearance, scroll to Fonts. For UI font (the sidebar, toolbars and labels), Body font (what you write), Heading font (note titles) and Monospace font (code), type the name of a font installed on your Mac, as it appears in Font Book. Leave a field empty to use Terra's default.
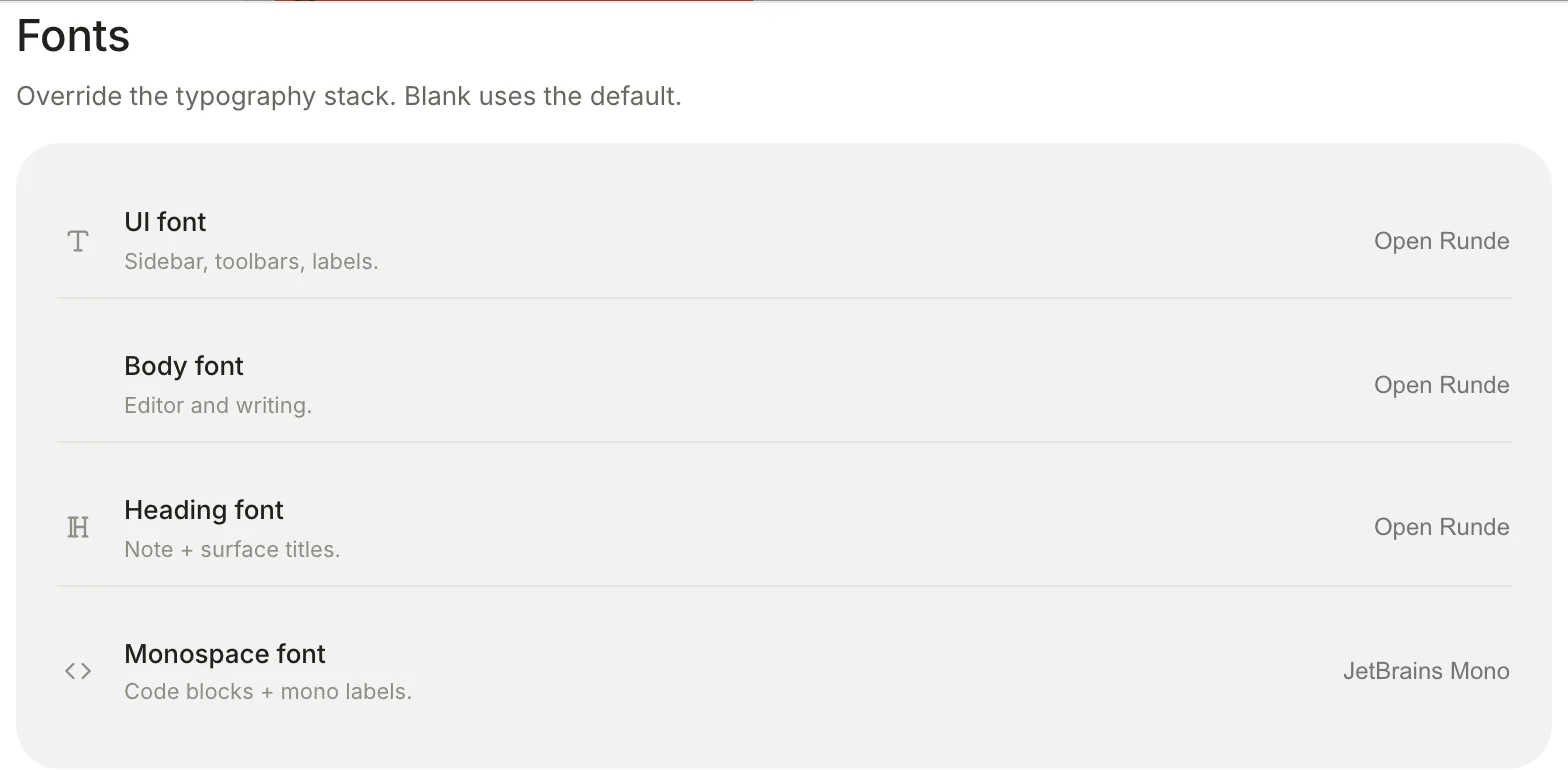
Type a font's name to use it; an empty field uses the default shown. Under Display, set the sizes with − and +:
Setting What it changes Range UI font size Everything except the text of your notes 11 to 18 px, default 13 Body font size The text you write and read 8 to 22 px, default 15 Zoom The whole window, like zooming a web page 70 to 150%, default 100% For the late sessions, set Body font size to 17.
Animations controls movement: Match system follows your Mac's Reduce motion setting, Full keeps every animation, Reduced keeps fades but stops animated GIFs, and Off removes all animation.
Note outline chooses what appears beside a note when the pane has room: Table of contents (a list of its headings), Minimap (a small picture of the whole note) or None. ⇧⌘O shows or hides it for now without changing the setting.
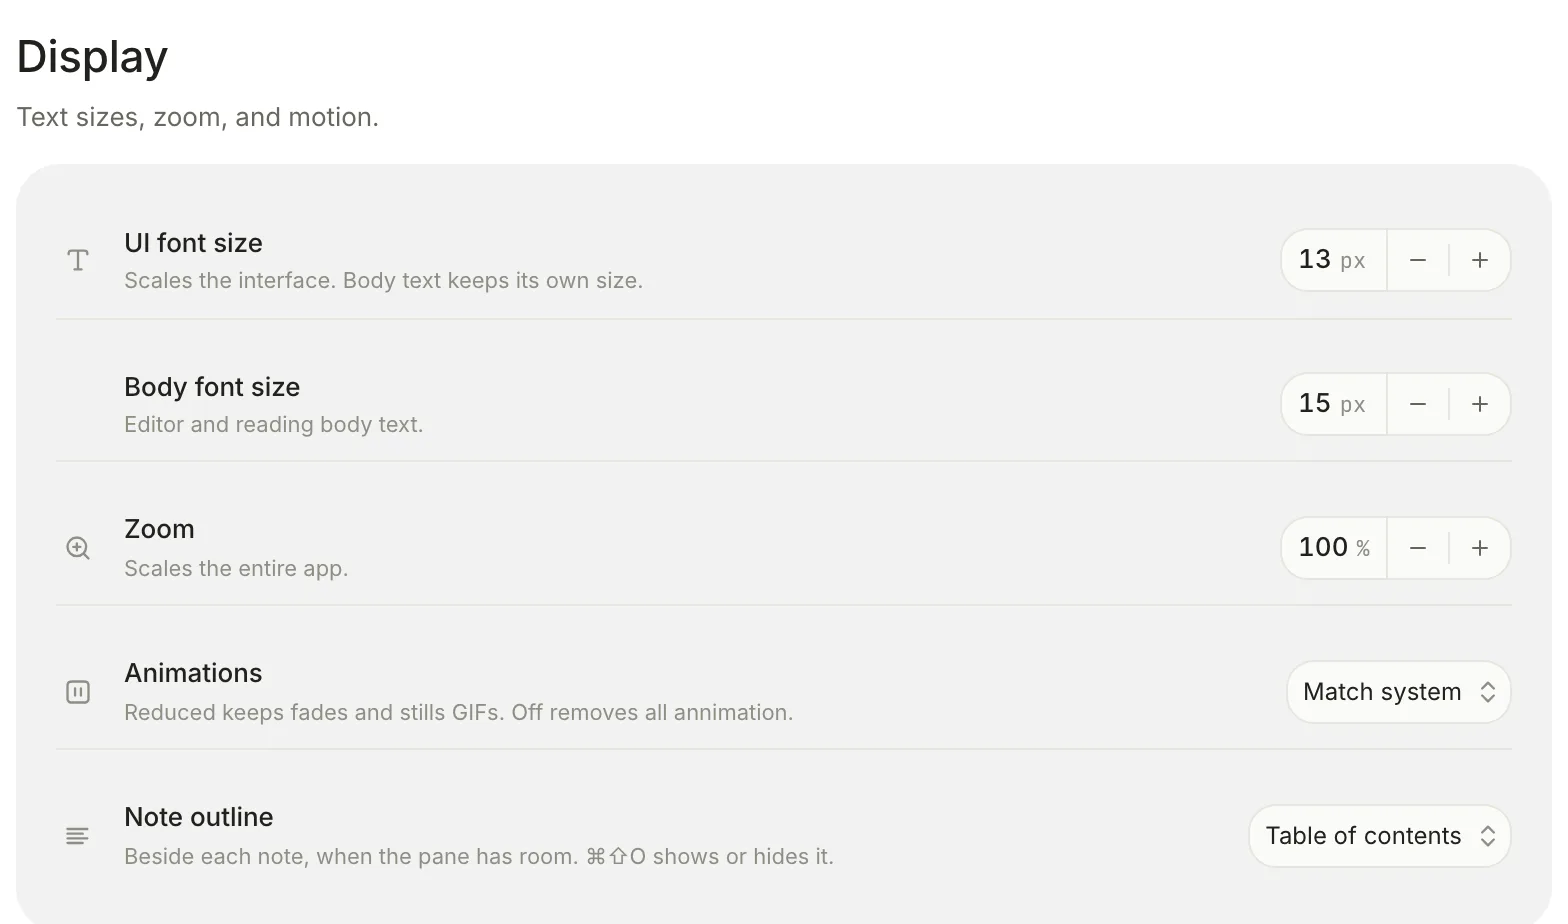
The Display settings. Each change shows at once.
From anywhere in Terra, ⌘= zooms in and ⌘- zooms out, changing the same Zoom setting; ⌘0 sets it back to 100%.
Step 4Put your buttons on the toolbar
The toolbar starts with the buttons most people use. You can add any command to it, and also notes, databases and views such as Tasks or Calendar. A button that opens the launch plan saves you hunting for it.
Right-click any button in the toolbar and choose Customize toolbar…. (The ⋯ at the far right of the toolbar has it too, and so does Settings › Toolbar.) The Toolbar pane opens with a preview of your toolbar and, below it, the Command library.
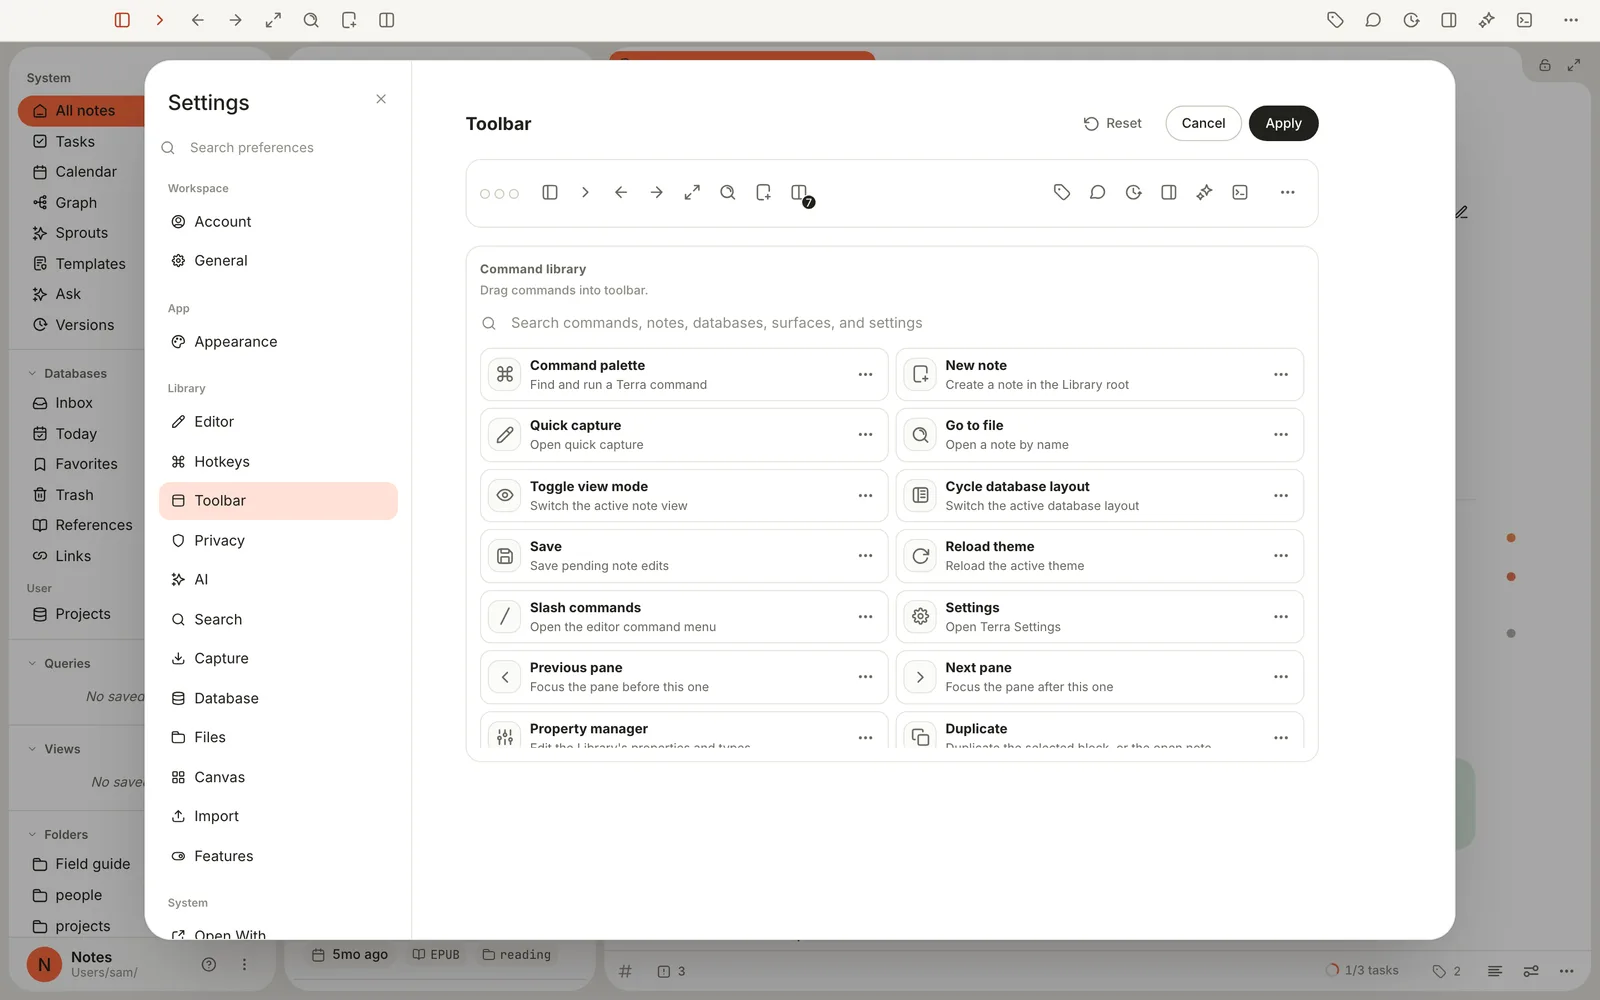
The preview at the top is your toolbar; drag things into it from the Command library. In the Command library, type in the search field to find what you want, such as Field guide launch plan.
Drag it into the preview: into the left group, the right group, or onto the ⋯ to put it in the More menu.
To move or hide a button, drag it to a new place in the preview, or drag it off the toolbar. You can also right-click a button for Move earlier, Move later, Leading, Trailing, More menu and Hidden.
To rename a button or change its icon, right-click it in the preview and choose Edit label and symbol…. Type a Label and pick a Symbol.
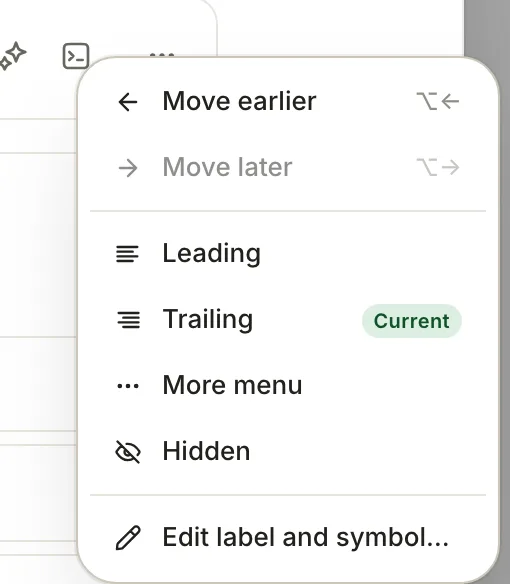
Where a button lives, and what it's called. Click Apply to keep your changes, or Cancel to throw them away. Reset puts back the toolbar Terra started with; click Apply after it.
In the preview, the layout buttons from Split to 2 × 2 show as one button with a number on it, Pane layouts. Click it to choose which layouts the toolbar offers.
Step 5Give commands your own keys
Any command can have keys, including ones that have none to start with, such as Database drawer or AI conversations.
- In Settings, click Hotkeys. (Help › Keyboard Shortcuts goes straight there.)
- Click the keys beside a command. They change to Press keys….
- Press the new keys, or Esc to back out.

Hover over a command to see Reset to default (the curved arrow) and Unbind (×). Terra doesn't warn you when two commands share keys, so pick ones that aren't taken. Keyboard shortcuts lists every default and covers the details.
Step 6Tune the editor
Settings › Editor holds the settings for writing:
- Caret style: the insertion point as a Line, a Block or an Underline. Turn off Blink caret for a steady one.
- Reference preview lines: how many lines of a note show when you point at a link to it, from 0 to 5.
- Citation style: how citations to your references are written.
- Task statuses: the checkbox marks your tasks can have, their names, and the board column each one goes in. See Tasks.
- Sprouts: the kinds of Sprout you can choose, each with its own name, icon and colour.
- Version history: turn it off to stop saving versions and hide Versions everywhere. See Sync and back up.
The editor toolbar above a note can move too: drag the arrow at its right end to another edge of the pane, or click it to hide the toolbar until you need it again.
Step 7Arrange the sidebar
The sidebar remembers your arrangement on this Mac.
- Reorder: drag a row up or down, or drag a section by its name.
- Collapse: click a section's name to fold it. Right-click any section name for Collapse all and Expand all.
- Pin to the rail: right-click a view such as Tasks, or a database, and choose Pin to rail. Pinned rows stay one click away when the sidebar is hidden.
- Change icon: right-click a row and choose Change icon, then pick one, or choose Default to go back.
- Hide built-ins you don't use: right-click Today, Links or another built-in database and choose Hide. To bring it back, right-click Databases and choose it under Hidden.
- Rename: your own databases, saved views and folders have Rename on their right-click menu.
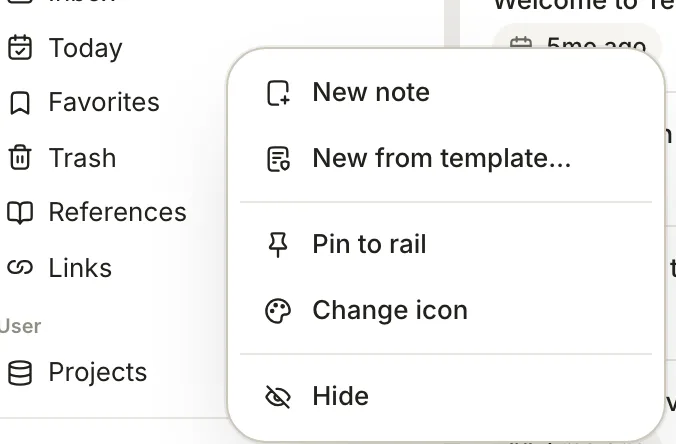
To change what the sidebar shows at the bottom, set a Display name and upload a logo in Settings › General, under Library. The display name replaces the folder's name in the sidebar; the folder itself isn't renamed.
Step 8Give one note its own page
Some notes read better wide, such as Printer quotes with its table, and some read better narrow. Each note can keep its own page width and font.
Open the note and click Reader preferences, the sliders at the bottom right of the note, beside ⋯.
Turn on Remember for this note. From now on, the width and font you choose are saved with this note.
Use the arrows beside Width to choose Narrow, Normal, Wide or Full width. For the quotes, choose Wide.
Under Font, choose Open Runde, EB Garamond or JetBrains Mono.
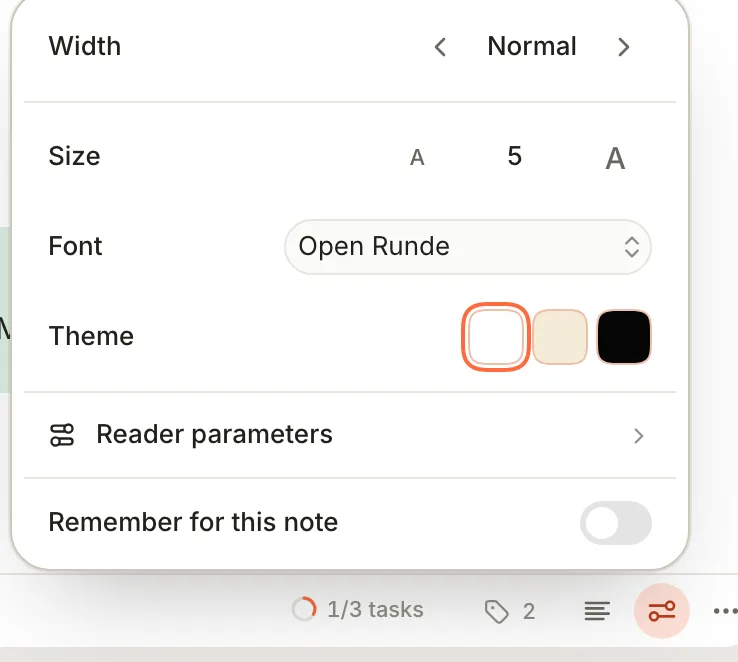
Turn on Remember for this note, then set the width and font.
Terra keeps the remembered width and font in the note's sidecar, so they apply wherever the note opens. Turn Remember for this note off to go back to the usual page.
With it off, Width applies to every note until you close the window. Font, Size, Theme (White, Sepia or Dark) and the Reader parameters, such as Line spacing, Justify text and Two columns, shape how notes look in Read mode. Switch a note to Read with the button beside its title, or press ⌥⌘E.
Features you might have missed
Switch off what you don't use
Settings › Features has a switch for AI, Web viewer, References, Canvas, Graph, Queries and Terminal, and under Database views for Calendar, Map, Gallery, Kanban and Sheets. A feature that's off disappears from places like the sidebar, the toolbar, the / menu and the command palette. Its files stay in your Library, and turning it back on brings everything back.
Decide where dropped files go
Settings › Files › Dropped files go to is Where I drop them by default: the folder or database under the pointer, or else the one that's open. Choose Always Inbox to collect every dropped file in the Inbox instead.
Choose what happens at launch
Settings › General › Open at launch reopens your last Library by default. Either of the other choices starts Terra on the Open a library screen instead. Week starts sets whether weeks in calendars and date groups start on Monday or Sunday.
Drop caps for reading
Settings › Appearance › Reading adds a large first letter to the first paragraph of a note in Read mode, with Drop-cap accent tint to colour it.
Troubleshooting
A font I typed doesn't appear
The name has to match a font installed on your Mac, as Font Book shows it. Check the spelling, or clear the field to go back to the default.
My toolbar changes are gone
Changes stick only after Apply; Cancel, or closing Settings, throws them away. The toolbar also belongs to the Library, so another Library keeps its own.
The menu bar still shows the old keys
The menu bar always shows a command's default keys, and those keys still work from there. Your new keys work in the window.
Line height and Tab size in Settings › Editor don't change anything
In this version those two settings have no effect. To give text more room, raise Body font size in Appearance, or Line spacing under Reader parameters for Read mode.
What's next
- Keyboard shortcuts: every default key, and how rebinding works.
- Find your way around: the parts of the window you've just been arranging.
- Sprouts: make your own kinds of Sprout, with your own colours.
- Read comfortably in the e-reader: themes and fonts for books and PDFs.
Was this guide helpful?