# Capture anything, and let Terra sort it for you
> Grab thoughts, links and messages from any app with Quick capture, then let enrichment tidy them into a template and the Jev classifier fill in your own categories.
Source: https://terramd.io/docs/capture-and-classify
Good ideas arrive at bad times — in the middle of a meeting, three tabs deep in a recipe site, while a video plays. The trick is to catch them in two seconds and sort them later. The trouble is that "later" rarely comes, and the pile grows.
Terra splits the job in two. **Quick capture** catches anything — a thought, a link, an email, a chat message — from any app and drops it into your Inbox. Then, if you want, **enrichment** does the sorting: it tidies the capture into a [template](https://terramd.io/docs/templates) (a recipe gets *Ingredients* and *Directions*), and a classifier model called **Jev** files it into categories you define, like *Indian*, *Italian* or *Weeknight*. Your [databases](https://terramd.io/docs/databases) pick it up from there.
This guide uses a recipe collection as the running example, because it shows every part of the pipeline. The same setup works for articles by topic, papers by method, or support requests by product.
> [!SUMMARY]
> - Capture a thought, link, email or message from any app in seconds
> - Turn on enrichment and choose the models that tidy and classify
> - Teach the classifier your categories with plain-language descriptions
> - Review what it decided, accept or dismiss its suggestions, and sort older notes the same way
> - Know what it costs and what leaves your Mac
> [!BEFORE]
> - A Library open in Terra. New to Terra? Start with the [Quickstart](https://terramd.io/docs/quickstart).
> - Capturing needs nothing else. Enrichment needs an AI provider for tidying (see [Connect an AI provider](https://terramd.io/docs/ask-your-library#connect-an-ai-provider)) and, for the classifier to file things automatically, an **OpenRouter** account — Jev runs there.
> - A few cents. Enrichment uses paid models; Terra caps the spend at a monthly budget you set (US$1 by default).
## How it fits together
Here's what happens when you save a capture with enrichment on:
1. **The capture is saved, immediately.** Terra writes a note into your `Inbox` folder before anything else happens. Whatever comes next, your capture is safe.
2. **Terra gathers context.** For a web link, it reads the page. For a video link (YouTube, Instagram, TikTok, Vimeo and others), it fetches the captions, or transcribes short videos on your Mac.
3. **The enrichment model tidies it.** If you picked a template, a language model fills in the template's sections — the ingredients list, the numbered directions — from the page, and Terra adds them to the note.
4. **Jev classifies it.** For each property you've marked **Auto-classify**, Jev picks from the options you defined. Confident picks are written into the note; less certain ones appear as suggestions for you to accept or dismiss.
5. **Your databases do the filing.** A database that shows "recipes where cuisine is Indian" picks the note up the moment the value lands.
Two things the classifier never does: it doesn't move notes out of the Inbox, and it doesn't invent categories. It only chooses among options you created, for properties you've opted in.
| Who | Does what | Set it in |
| --- | --- | --- |
| You | Capture, pick a template, switch **Enrich** on | The Quick capture card |
| The enrichment model | Fills the template's sections | **Settings › AI › Capture › Enrichment** |
| Jev, the classifier | Picks values for **Auto-classify** properties | **Settings › AI › Capture › Classifier** |
| Your databases | Show the note wherever its values belong | A database's filter |
## Step 1: Capture your first thought
1. From any app, press ⌃ ⌥ ⌘ N. (Or, in Terra, choose **File › Quick Capture…**.) Terra comes to the front with the Quick capture card, with the cursor in **Title**.
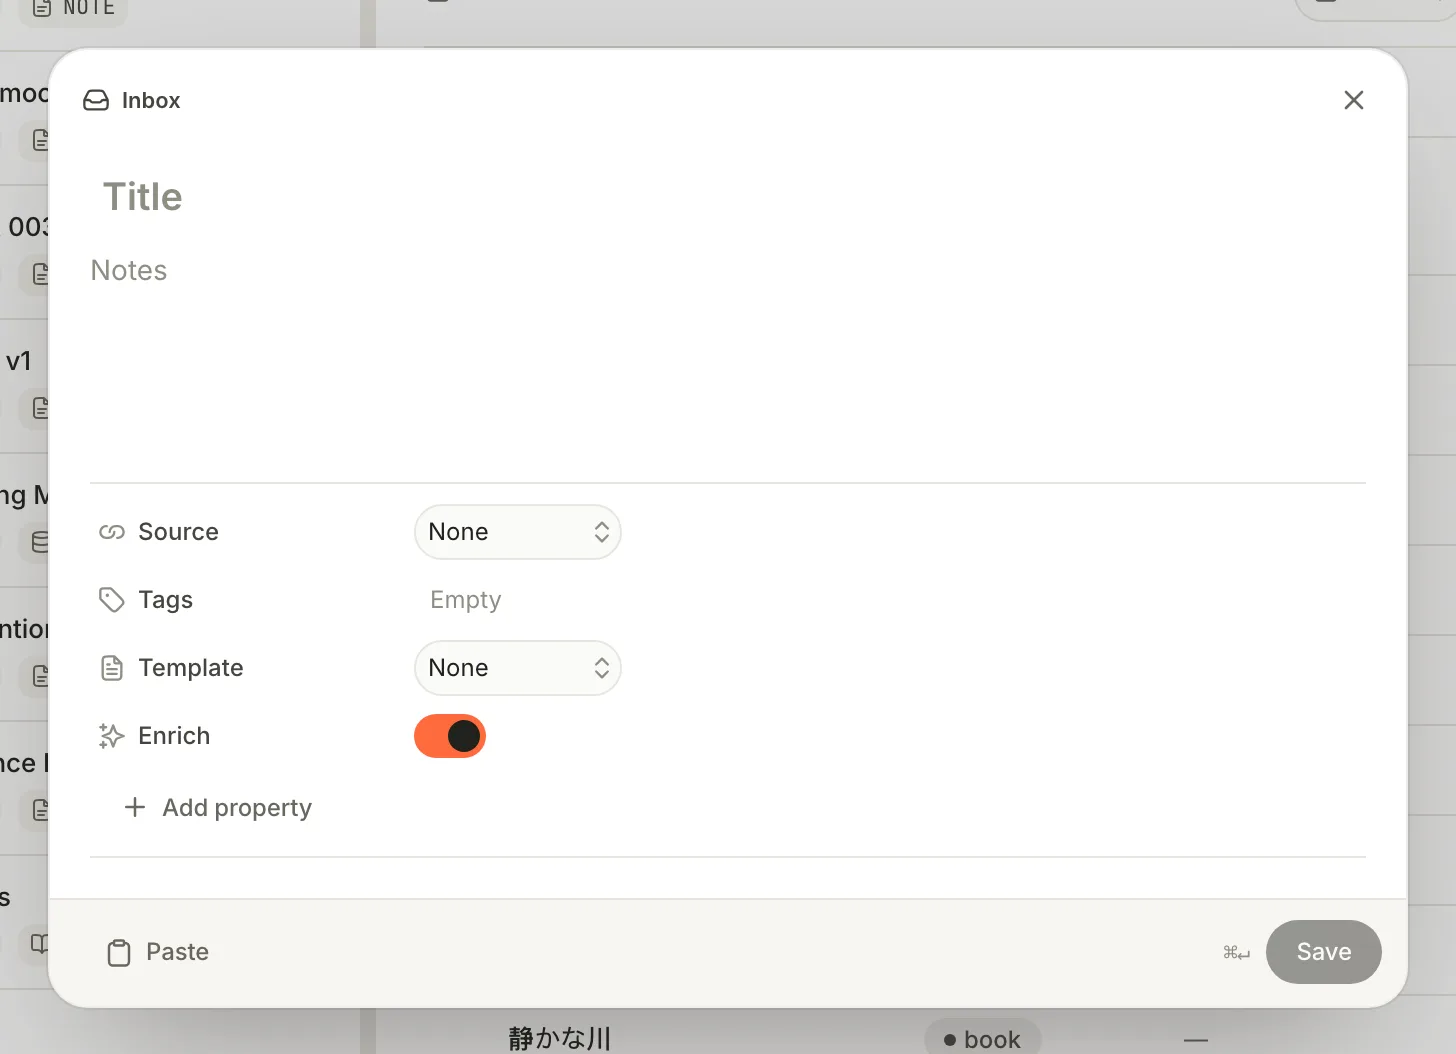
2. Type a **Title**, some **Notes**, or both.
3. Add **Tags** if you like, separated by commas.
4. Press ⌘ Return, or click **Save**. The card closes and Terra confirms: **Captured "…" to Inbox**.
Your capture is now a note in the `Inbox` folder. Find it under **Folders › Inbox** in the sidebar.
> [!WARNING] Esc throws the draft away
> Pressing Esc or clicking outside the card closes it without saving, and there's no undo. Press ⌘ Return before you look away.
## Step 2: Capture a link, an email or a message
The **Source** row says where the thing came from, and adds the right fields.
1. Copy the link in your browser.
2. Open Quick capture and click **Paste** at the bottom left. Terra fills **URL** and switches **Source** to **Link**. (A Slack message link switches it to **Message** instead.)
3. Give it a **Title** — *Dal makhani in 5 minutes*.
4. Click **Save**.
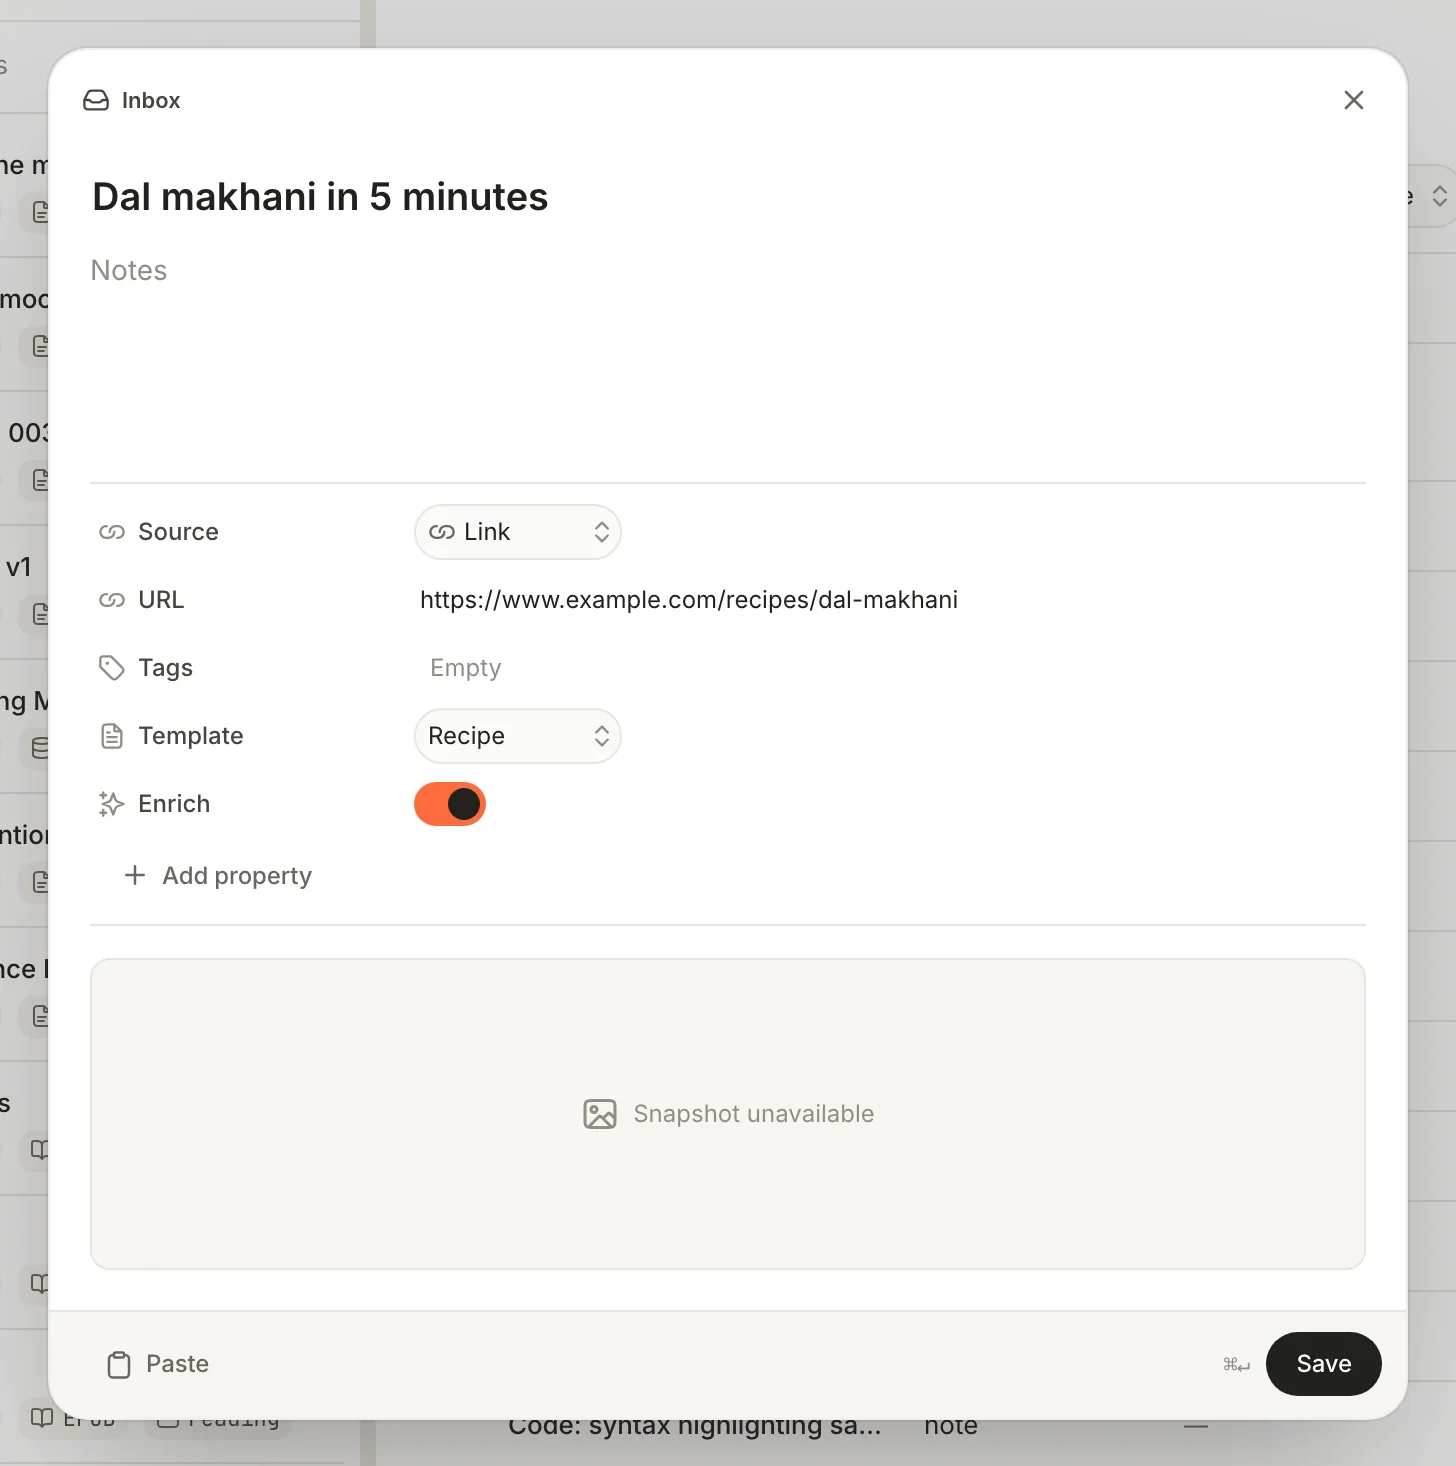
You can also set the source by hand: click **Source** and choose **Link**, **Email** or **Message**.
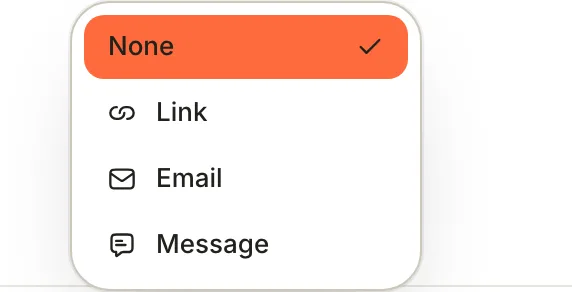
- **Email** adds a **From** field — who sent it.
- **Message** adds **From** and **Conversation** — say, the channel name.
- **Add property** adds any field of your own, such as *Rating*.
Every capture with a URL also appears in the built-in **Links** database.
> [!NOTE] A link capture keeps the address, not the page
> Without enrichment, Terra saves the link, not the article's text. To keep the full text of a page, open it in Terra's browser and use **Save to Terra** (see [features you might have missed](#features-you-might-have-missed)).
## Step 3: Turn on enrichment
Enrichment is off until you set it up. You'll choose two models — one to tidy, one to classify — and a budget.
1. Open **Settings** (⌘ ,) and click **AI** under **Library**.
2. Make sure you have the providers you need under **Providers**. For the full experience, connect **OpenRouter** (it runs Jev) plus the provider you want for tidying — it can be OpenRouter too. [Connecting a provider](https://terramd.io/docs/ask-your-library#connect-an-ai-provider) takes a minute.
3. Scroll to the **Capture** section and turn on **Enrich captures**. This switches **Enrich** on by default in every new capture.
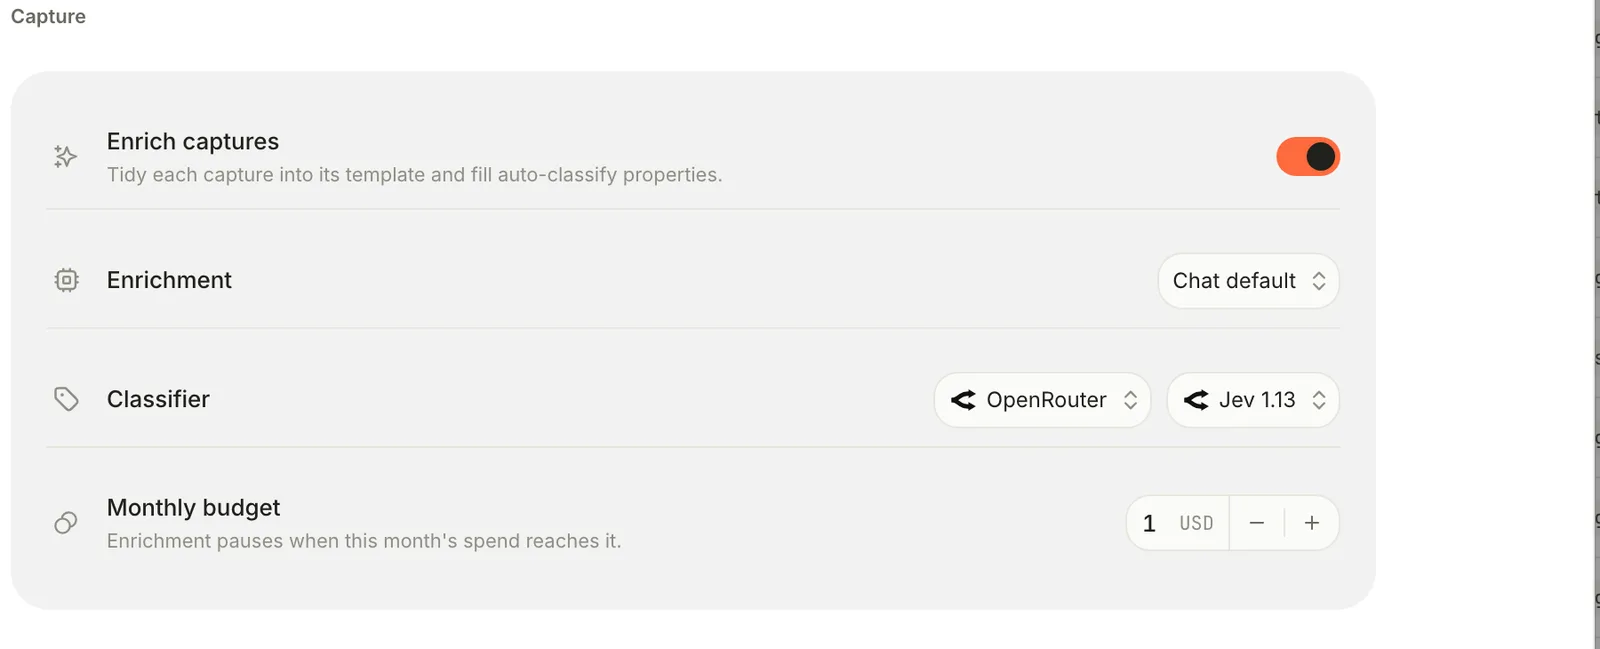
4. In **Enrichment**, choose a provider — for example **Claude** or **OpenRouter** — and then choose a **Model**. Pick both explicitly rather than leaving **Chat default**.
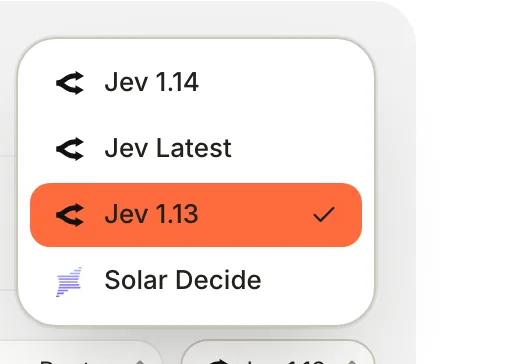
5. In **Classifier**, leave **OpenRouter** and **Jev 1.13** selected. Click the model name to see newer Jev versions when they're available.
6. Set a **Monthly budget** in US dollars. Enrichment stops for the rest of the month when spending reaches it.
Changes save as you make them.
> [!NOTE] Why OpenRouter matters for the classifier
> Jev gives each pick a calibrated confidence score, and Terra only fills in a value automatically when that score clears your threshold. Without an OpenRouter connection — or with **Classifier** set to **Enrichment model** — Terra falls back to the tidying model, which can't score its picks, so *every* pick becomes a suggestion for you to review. Nothing warns you about this, so it's worth checking.
## Step 4: Teach the classifier your categories
The classifier only works on properties you've opted in, and only chooses among their options. The better you describe them, the better it chooses.
1. Choose **Tools › Property Manager…**. The **Property manager** opens with your **Properties**.
2. Click **+** (**New property**). Name it `cuisine` and set **Type** to **Multi-select** — a dish can be *Indian* and a *Weeknight* meal at once. (Use **Select** when exactly one value fits.)
3. Under **Options**, click **+** to add each option: *Indian*, *Italian*, *Mexican*, *Weeknight*.
4. In **Description**, write the question the classifier should answer: *Which cuisine does this dish come from?*
5. Turn on **Auto-classify**. Three more settings appear:
- **Apply at confidence** — picks scoring at least this much are written automatically; lower ones become suggestions. Start at **80 %**.
- **Most values** (multi-select only) — the most options it may pick. **2** suits cuisine.
- **Option meanings** — one line per option saying what belongs there.
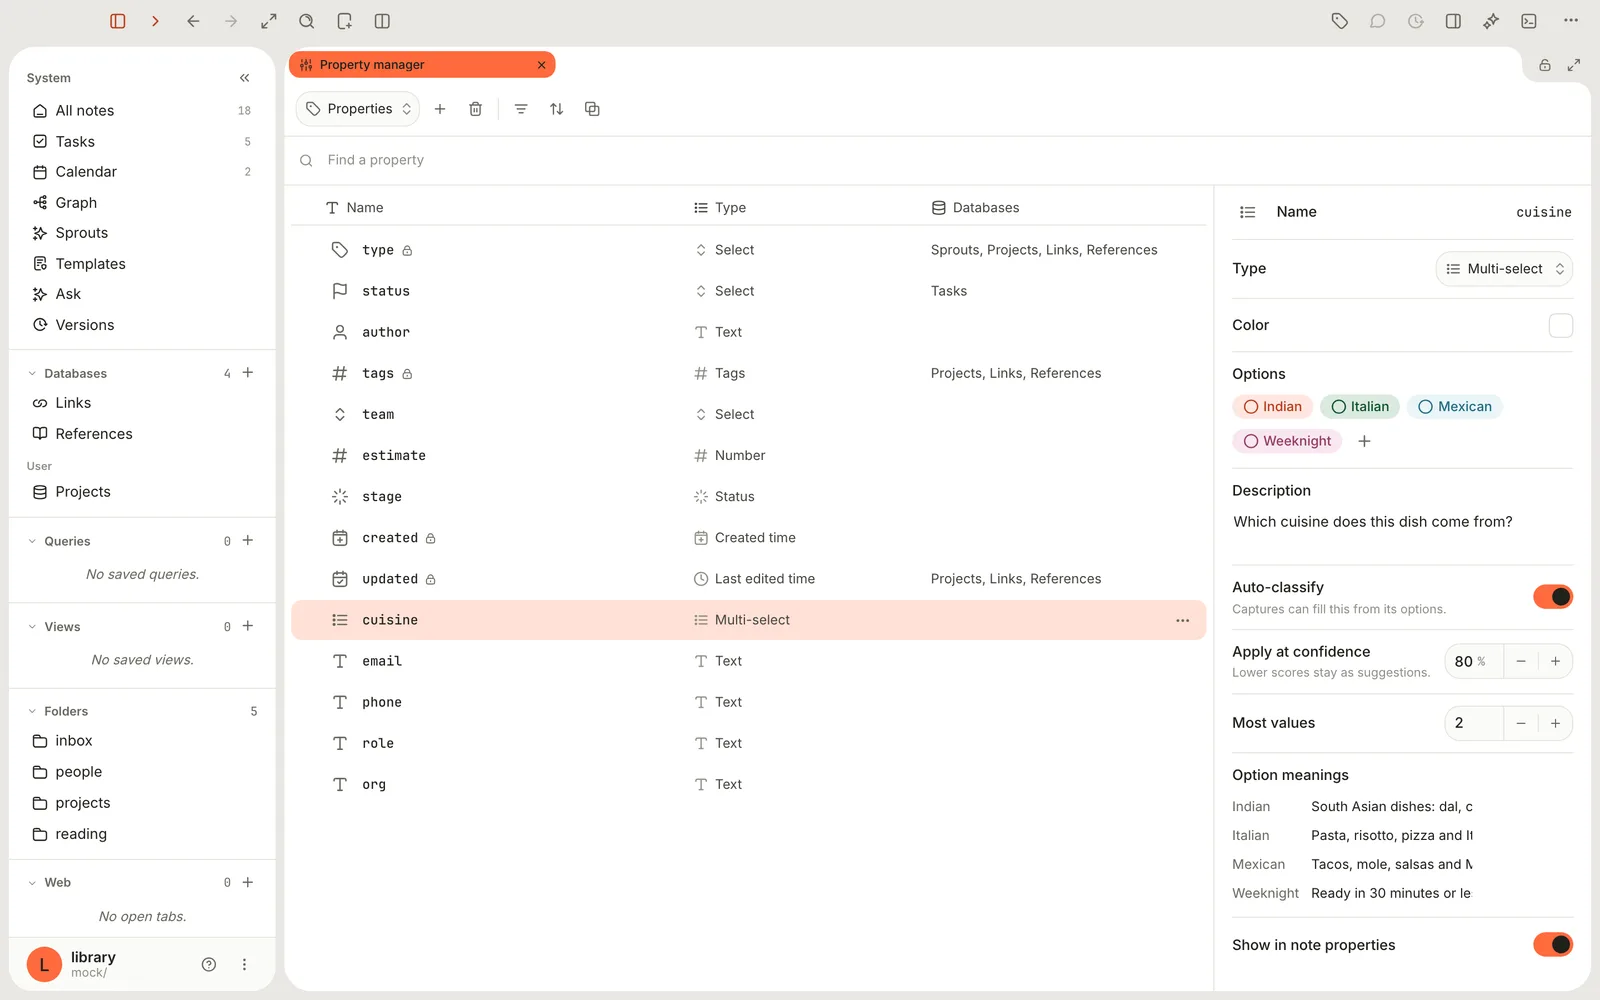
Write option meanings the way you'd brief a new assistant: *South Asian dishes: dal, curry, biryani, dosa* works better than *Indian food*, and *Ready in 30 minutes or less* turns a vague *Weeknight* into a rule.
> [!TIP] Keep the classifier focused
> Every property with **Auto-classify** on is considered for every enriched capture. A handful of well-described properties gives better results — and costs less — than a dozen vague ones.
## Step 5: Capture with a template and Enrich
Now put it together.
1. Copy a recipe link and press ⌃ ⌥ ⌘ N.
2. Click **Paste**, and add a **Title** if the page title isn't what you want.
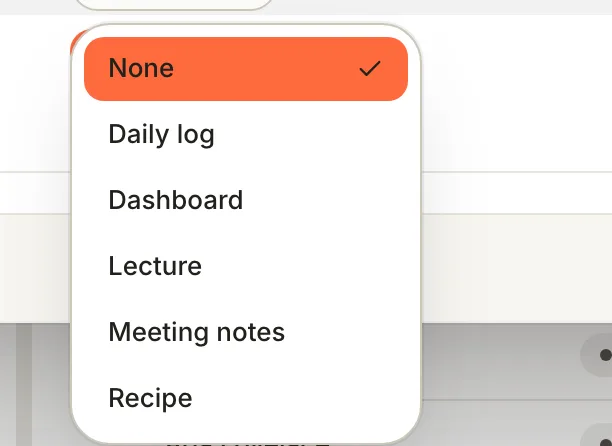
3. Click **Template** (it says **None**) and choose **Recipe**.
4. Check that **Enrich** is on, then press ⌘ Return.
The capture is saved at once. Enrichment then runs in the background — there's no progress bar, and it can take a little while for long pages or videos. When it's done, the note has changed:
```markdown
---
title: Dal makhani in 5 minutes
nav: Capture and classify
type: link
tags:
- recipe
source:
kind: link
url: https://www.example.com/recipes/dal-makhani
cuisine:
- indian
---
# Dal makhani in 5 minutes
[Dal makhani in 5 minutes](https://www.example.com/recipes/dal-makhani)
> [!note] Ingredients
> - 1 cup black lentils
> - …
## Directions
1. …
2. …
```
The template's sections are added after anything you wrote, the template's tags (here `recipe`) are merged into the note's tags, and `cuisine` holds Jev's confident pick. If something goes wrong, Terra shows **Couldn't enrich capture:** and the reason — and your capture is still there, exactly as you saved it.
> [!NOTE]- What exactly gets sent, and where?
> To tidy: the title and the capture's text (plus the page or transcript Terra fetched) go to your **Enrichment** provider. To classify: the title and text, with your property descriptions and option meanings, go to OpenRouter for Jev. Your other notes, properties and tags aren't sent. Video transcription happens on your Mac using macOS speech recognition, and downloaded audio is deleted afterwards.
## Step 6: Review what the classifier decided
1. Open the note from your Inbox.
2. Look at the properties under the title:
- Values shown normally were confident enough to be **applied**.
- Faded values are **suggestions**. Point at one to see **Suggested — click to apply**.
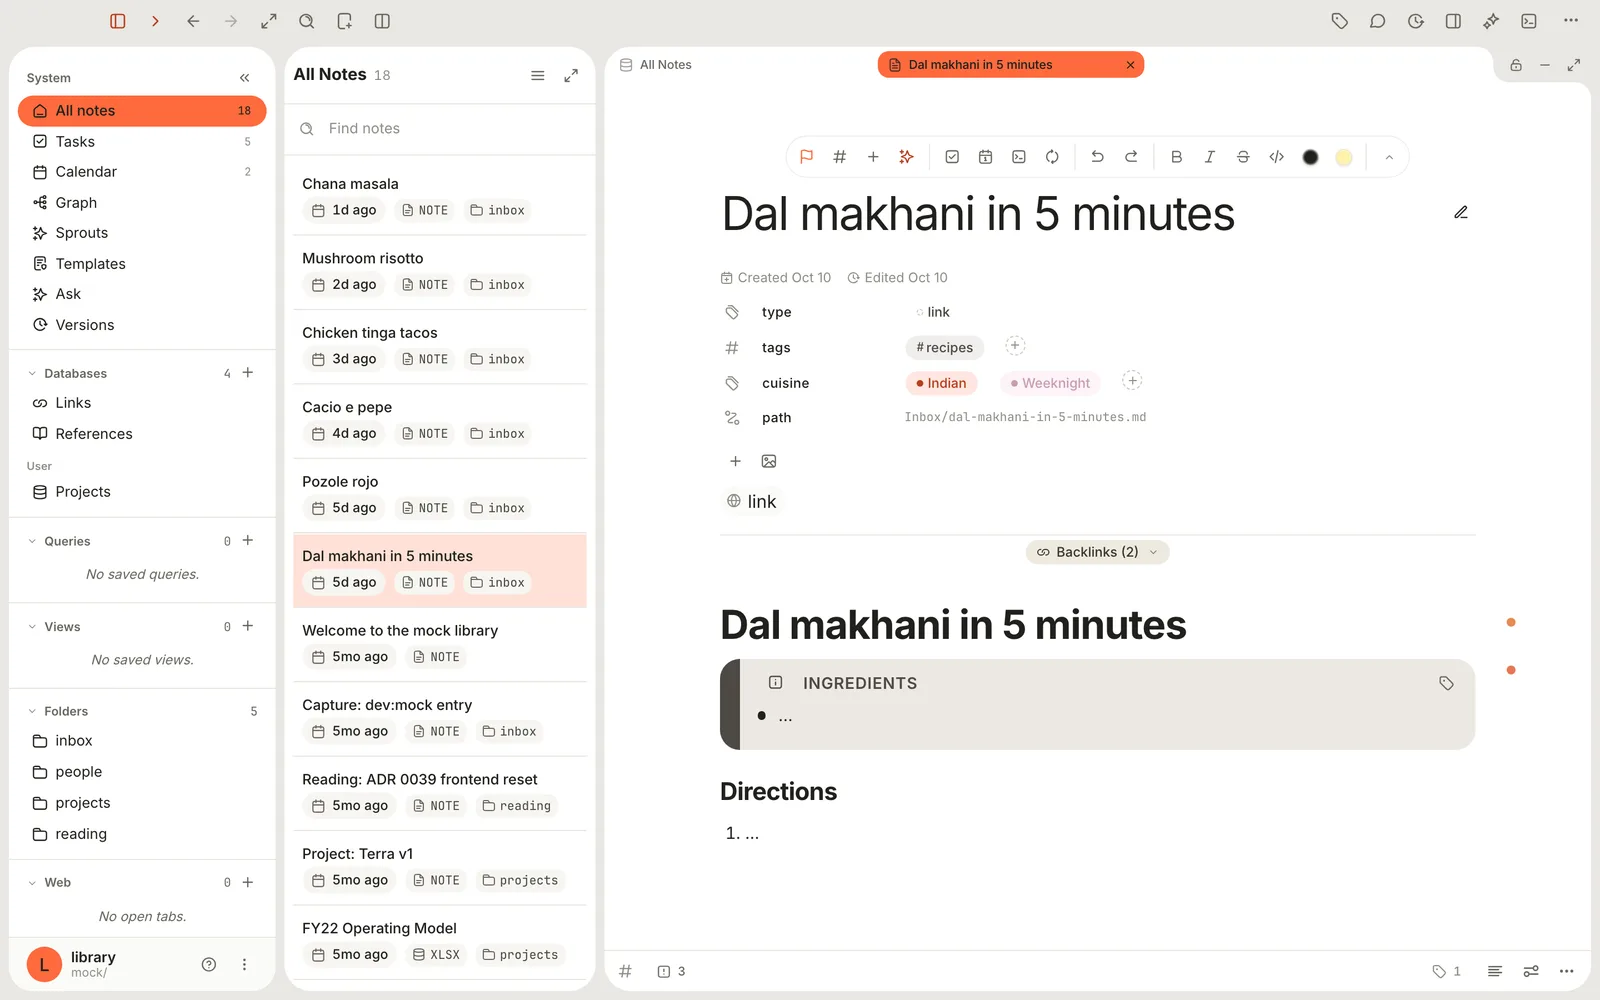
3. Click a suggestion to apply it, or point at it and click **×** (**Dismiss suggestion**) to turn it down.
4. Change or clear any applied value the way you'd edit any property.
Suggestions appear on the note's own page, not in tables or boards. There's no single undo for enrichment: delete any added sections in the editor, and change values by hand.
> [!TIP] Tune the threshold to your patience
> Getting too many suggestions to review? Lower **Apply at confidence** a little. Finding wrong values applied? Raise it, and sharpen the option meanings.
## Step 7: Let databases do the filing
Captures stay in your `Inbox` folder; "filed" means the right databases show them. Build one view for each way you'll want to browse:
1. Create a database — sidebar **Databases** › **+**, name it *Recipes*, add the condition **tags** · **contains** · `recipe`, and click **Save**.
2. Add a **Board** view and set **Show boards as** to `cuisine`.
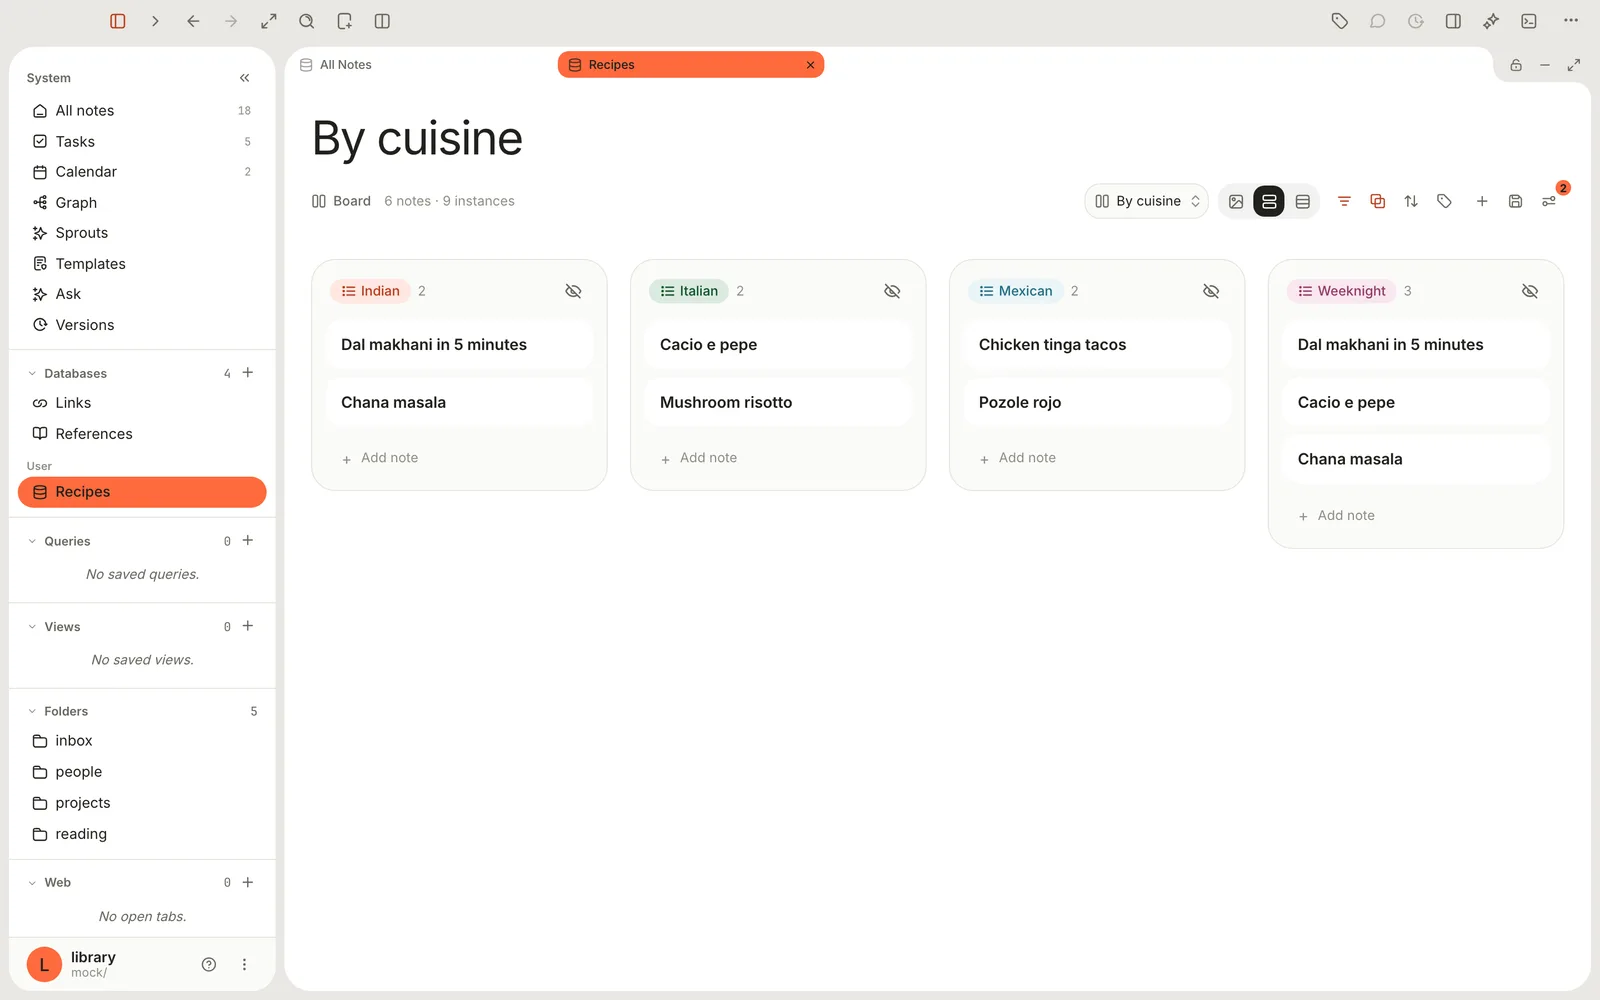
Every new recipe you capture appears in the right column as soon as Jev has classified it. Prefer tidy folders too? Use the note's **Note actions** menu (**⋯** at the bottom of the note) › **Move note** to move it out of the Inbox once you've reviewed it. [Run a project with boards, timelines and burndowns](https://terramd.io/docs/project-suite) covers databases and views in depth.
## Step 8: Sort the notes you already have
The classifier can also go back through notes you captured before you set it up.
1. Open the database whose notes you want to sort and click **View preferences** (the settings icon at the right of its header).
2. In the panel, click **Classify notes** (the sparkle icon).
3. Terra estimates the job — how many notes, which properties, and roughly what it will cost. Click **Classify**.
4. Review the list of proposed changes. Untick any you don't want, then click **Apply**. Terra confirms with **Classified N notes**.
> [!WARNING] Classify notes can overwrite values
> Unlike enrichment at capture time, **Classify notes** reconsiders properties that already have values and proposes replacements — and for multi-select properties, it replaces the whole list. Review the changes before you apply them.
## What it costs
Enrichment calls paid models, so Terra keeps a running total for each Library and stops at your **Monthly budget**:
- Spending is counted per calendar month (UTC) and resets on the 1st.
- When the budget is reached, enrichment stops for that capture with a message, and the capture itself is still saved. Captures made after that aren't enriched until next month or until you raise the budget — and raising it doesn't re-run the ones you missed.
- A budget of `0` turns enrichment calls off entirely.
- Classifying is very cheap. Tidying costs more, depending on the model you chose and how long the page or transcript is — long videos and big articles cost the most.
## Features you might have missed
### Transcripts of videos, without a template
Capture a YouTube, Instagram, TikTok or Vimeo link with **Enrich** on and no template, and Terra adds the post's caption and a timestamped transcript under a **Source** heading. Captions come from the site; short videos without captions (up to 20 minutes) are transcribed on your Mac. The first time, macOS asks for permission to use speech recognition.
### Templates without paying for AI
Pick a template that has nothing for a model to fill — like **Meeting** or **Daily log** — with **Enrich** on, and Terra simply appends the template's sections and tags. If no property has **Auto-classify** on, no model is called at all.
### Keep the whole page with Save to Terra
Terra has its own browser. Choose **View › New Webpage**, open the page, then click **Page options** (next to the address bar) › **Save to Terra**. Terra saves the article's text as Markdown, plus a picture of the page, into your Inbox.
### Add a paper or book by its DOI or ISBN
Click **New…** in the toolbar, choose **Add reference**, paste a DOI or ISBN and click **Look up**. Terra creates a reference note with authors, date and publisher, ready to cite. See [Build a research library](https://terramd.io/docs/research-library).
### Paste as note
Right-click an empty part of the window and choose **Paste as note** to turn whatever's on your clipboard into a new Inbox note.
### Share from Safari
In release builds of Terra, the macOS **Share** menu has a **Terra** item. It opens Quick capture filled in with the page's title and address; nothing is saved until you click **Save**.
### A capture button and an in-app shortcut
Add a **Quick capture** button to the toolbar with **Customize toolbar…** (right-click any toolbar button). To open the card with a different shortcut while you're in Terra, set one for **Quick capture** in **Settings › Hotkeys**, under **Global**.
## Troubleshooting
> [!NOTE]- Nothing is ever applied — everything arrives as a suggestion
> The classifier is running without OpenRouter. Check that **OpenRouter** is connected under **Settings › AI › Providers** and that **Classifier** is set to **OpenRouter** with a Jev model. Also check **Apply at confidence** isn't set too high.
> [!NOTE]- "Couldn't enrich capture: enrichment model unavailable"
> The tidying model can't be reached. In **Settings › AI › Capture**, set **Enrichment** to a connected provider *and* pick a **Model** — **Chat default** may point at a model you haven't set up.
> [!NOTE]- "Monthly enrichment budget reached"
> You've hit the cap for this month. Raise **Monthly budget** in **Settings › AI**, in the **Capture** section (the message may say "Settings → Capture" — it's moved). Captures that weren't enriched stay as they were.
> [!NOTE]- I picked a template but nothing was added
> Templates only apply when **Enrich** is on in the card. Check the switch before saving.
> [!NOTE]- The page's text isn't in my note
> Enrichment reads the page to fill in your template, but doesn't paste the article in. To keep the full text, use **Save to Terra** in Terra's browser.
> [!NOTE]- The capture shortcut doesn't work
> Terra has to be running, and another app may already use ⌃ ⌥ ⌘ N. You can still use **File › Quick Capture…**. To change the global shortcut, quit Terra, open `~/Library/Application Support/Terra/preferences.toml` in a text editor and change `global_hotkey` under `[capture]` (for example `"ctrl+option+cmd+j"`), then reopen Terra.
## What's next
- [Templates](https://terramd.io/docs/templates) — design the templates your captures fill in.
- [Run a project with boards, timelines and burndowns](https://terramd.io/docs/project-suite) — build the databases that do the filing.
- [Get answers from your own notes](https://terramd.io/docs/ask-your-library) — ask questions across everything you've captured.